> For the complete documentation index, see [llms.txt](https://ai-docs.fptcloud.com/llms.txt). Markdown versions of documentation pages are available by appending `.md` to page URLs; this page is available as [Markdown](https://ai-docs.fptcloud.com/ai-factory-guideline-jp/fpt-gpu-cloud/gpumashin/chtoriaru/pfsense-nettowkugtowei.md).
# pfSense ネットワークゲートウェイ
冗長構成(HA)設定手順
この記事では、pfSense を使用して高可用性 (HA) ネットワークゲートウェイを構築する方法について紹介します。この FreeBSD ベースのオープンソースソフトウェアは、安定したネットワーク環境の実現に役立ちます。
## pfSenseとは?
pfSense は、ルーター、ファイアウォール、VPN、プロキシなど、さまざまなネットワーク機能を実装できる FreeBSD ベースのオープンソースのルーター/ファイアウォールソフトウェアです。
ExpressRoute/サイト間VPN構築時の仮想ネットワークゲートウェイの設定も公式ドキュメントに記載されているため、多くの企業環境で安心して利用できます。
## ファイルの準備
{% stepper %}
{% step %}
### pfSense ISOファイルのダウンロード
pfSense 公式ウェブサイト () にアクセスし、最新の ISO イメージをダウンロードします。
{% endstep %}
{% step %}
### FPT CLOUD コンソールにログイン
[https://console.fptcloud.jp/ ](https://console.fptcloud.jp/)にアクセスし、提供された認証情報でログインします。
{% endstep %}
{% step %}
### ISOファイルのアップロード
ダウンロードした pfSense ISO ファイルを選択し、ポータルにアップロードします。アップロードが完了すると確認メッセージが表示されます。

{% endstep %}
{% endstepper %}
## ネットワーク環境の準備
{% stepper %}
{% step %}
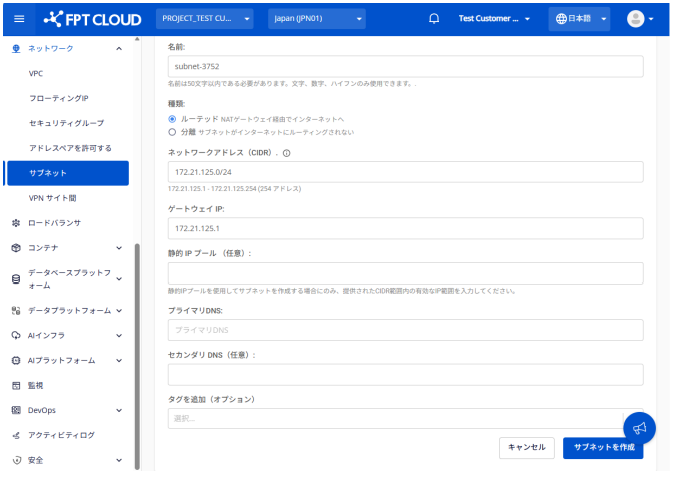
### t新しいサブネットの作成
FPT CLOUD Console で、要件に応じて新しいサブネットを作成します。これにより、pfSense のネットワークインターフェースに必要な IP アドレスを割り当てることができます。
{% endstep %}
{% step %}
### セキュリティグループの作成
環境のセキュリティルールを定義し、pfSense仮想マシン間の通信とネットワークトラフィックを制御するための適切なセキュリティグループを作成します。
{% endstep %}
{% endstepper %}
## pfSense仮想マシンの作成
{% stepper %}
{% step %}
### Compute Engine
FPT CLOUD コンソールの「Compute」メニューに移動し、**「インスタンスの作成」**をクリックします。
{% endstep %}
{% step %}
### 基本情報の設定
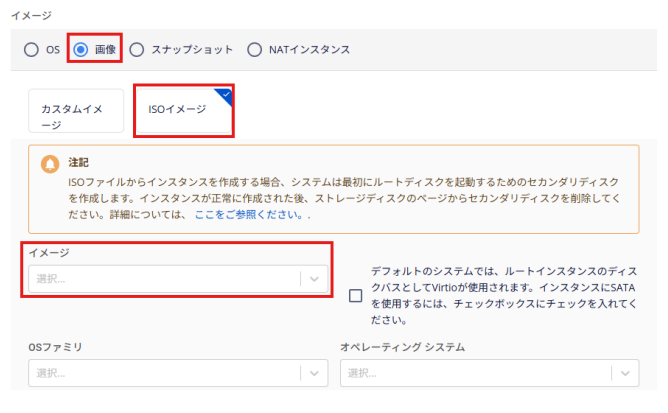
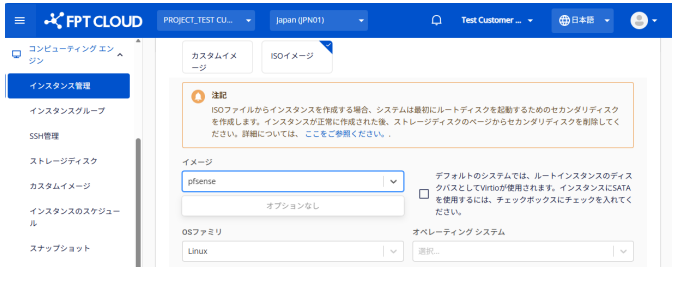
インスタンス名(例:pfsense-master または pfsense-slave)を設定し、**ISO** イメージオプションで先にアップロードした pfSense ISO を選択します。
{% endstep %}
{% step %}
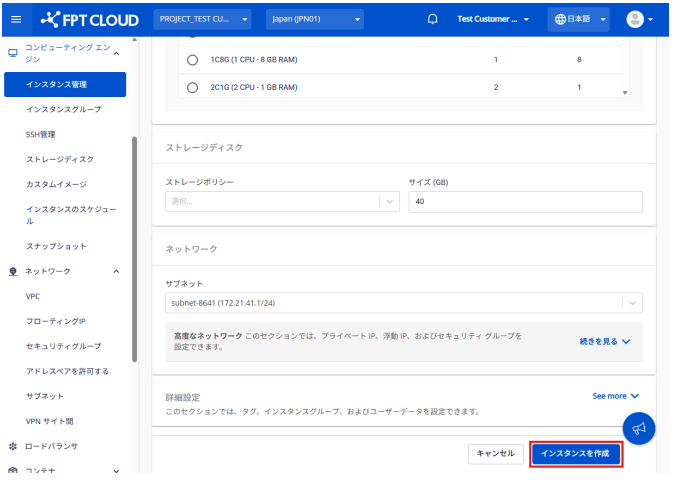
### リソースとネットワークの設定
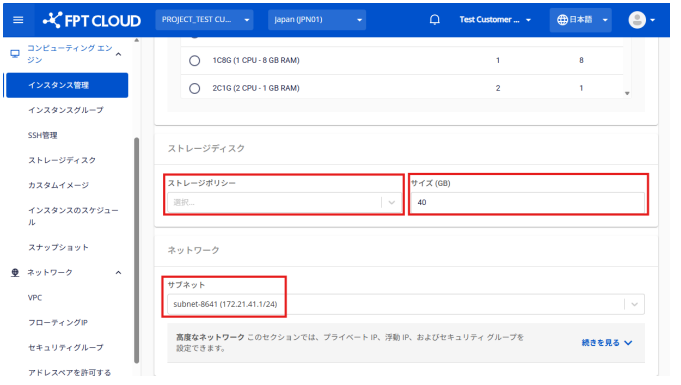
必要なリソースサイズ(CPU/RAM)を選択し、必要なネットワークを接続します。
{% endstep %}
{% step %}
### セキュリティグループの接続
作成したセキュリティグループをアタッチし、仮想マシンを作成します。
{% endstep %}
{% endstepper %}
## HA(高可用性)要件
高可用性(HA)実装の最低要件
* pfSense ネットワークインターフェース上のサブネットごとに最低3つのIPアドレス(マスター用1つ、スレーブ用1つ、外部通信用仮想IP)
* レイヤー2デバイスはマルチキャストをサポートしている必要がある
* CARPで使用される仮想IPアドレスにアクセス可能な上流/ISP/ルーター
## pfSenseインターフェースの設定
### 新しいネットワーク:カードの追加
* **「インターフェース」**メニューから「割り当て」を選択し、**「追加」**をクリックして新しいインターフェースを追加します。
* OPT1 インターフェースをダブルクリックし、必要な情報を入力します。
* 設定後、**「保存」**をクリックし、**「変更を適用」**をクリックします。
### ファイアウォール: ルール作成
* **「ファイアウォール」**メニューから**「ルール」**を選択し、**「同期」**タブに切り替えます。
* **「追加」**をクリックして新規ルールを作成し、必要な情報を入力します。
* 設定が完了したら、**「保存して変更を適用」**をクリックします。
* 両方のpfSenseサーバーで同じ設定を行います。
## CARP(高可用性プロトコル)の設定
### マスターでの CARP 設定
* **「システム」**メニューから「高可用性同期」を選択し、必要な情報を入力します。
* リモートシステムのユーザー名とパスワードは、pfSense スレーブ仮想マシン上の高権限ユーザーの認証情報を指定します。
### スレーブでの CARP 設定
* 同様に、「システム」メニューから「高可用性同期」を選択し、必要な情報を入力します。
* 設定はマスターとは異なりますので、指示に従って適切に設定してください。
---
# Agent Instructions
This documentation is published with GitBook. GitBook is the documentation platform designed so that both humans and AI agents can read, navigate, and reason over technical content effectively. Learn more at gitbook.com.
## Querying This Documentation
If you need additional information that is not directly available in this page, you can query the documentation dynamically by asking a question.
Perform an HTTP GET request on the current page URL with the `ask` query parameter, and the optional `goal` query parameter:
```
GET https://ai-docs.fptcloud.com/ai-factory-guideline-jp/fpt-gpu-cloud/gpumashin/chtoriaru/pfsense-nettowkugtowei.md?ask=&goal=
```
`ask` is the immediate question: it should be specific, self-contained, and written in natural language.
`goal` is optional and describes the broader end goal you are ultimately trying to accomplish on behalf of the user. GitBook uses it to tailor the answer towards what is most useful for that goal.
The response will contain a direct answer to the question and relevant excerpts and sources from the documentation.
Use this mechanism when the answer is not explicitly present in the current page, you need clarification or additional context, or you want to retrieve related documentation sections.