> For the complete documentation index, see [llms.txt](https://ai-docs.fptcloud.com/llms.txt). Markdown versions of documentation pages are available by appending `.md` to page URLs; this page is available as [Markdown](https://ai-docs.fptcloud.com/fpt-ai-studio/services/model-hub/tutorials/how-to-use-private-model.md).
# How to Use Private Model?
### **Create Model**
**Create Model** allows users to build a private AI model by customizing its basic settings, metadata, and access controls. On the Model Hub service screen, click the Create button to go to the creation page.
#### **Step 1: Fill in Basic Information**
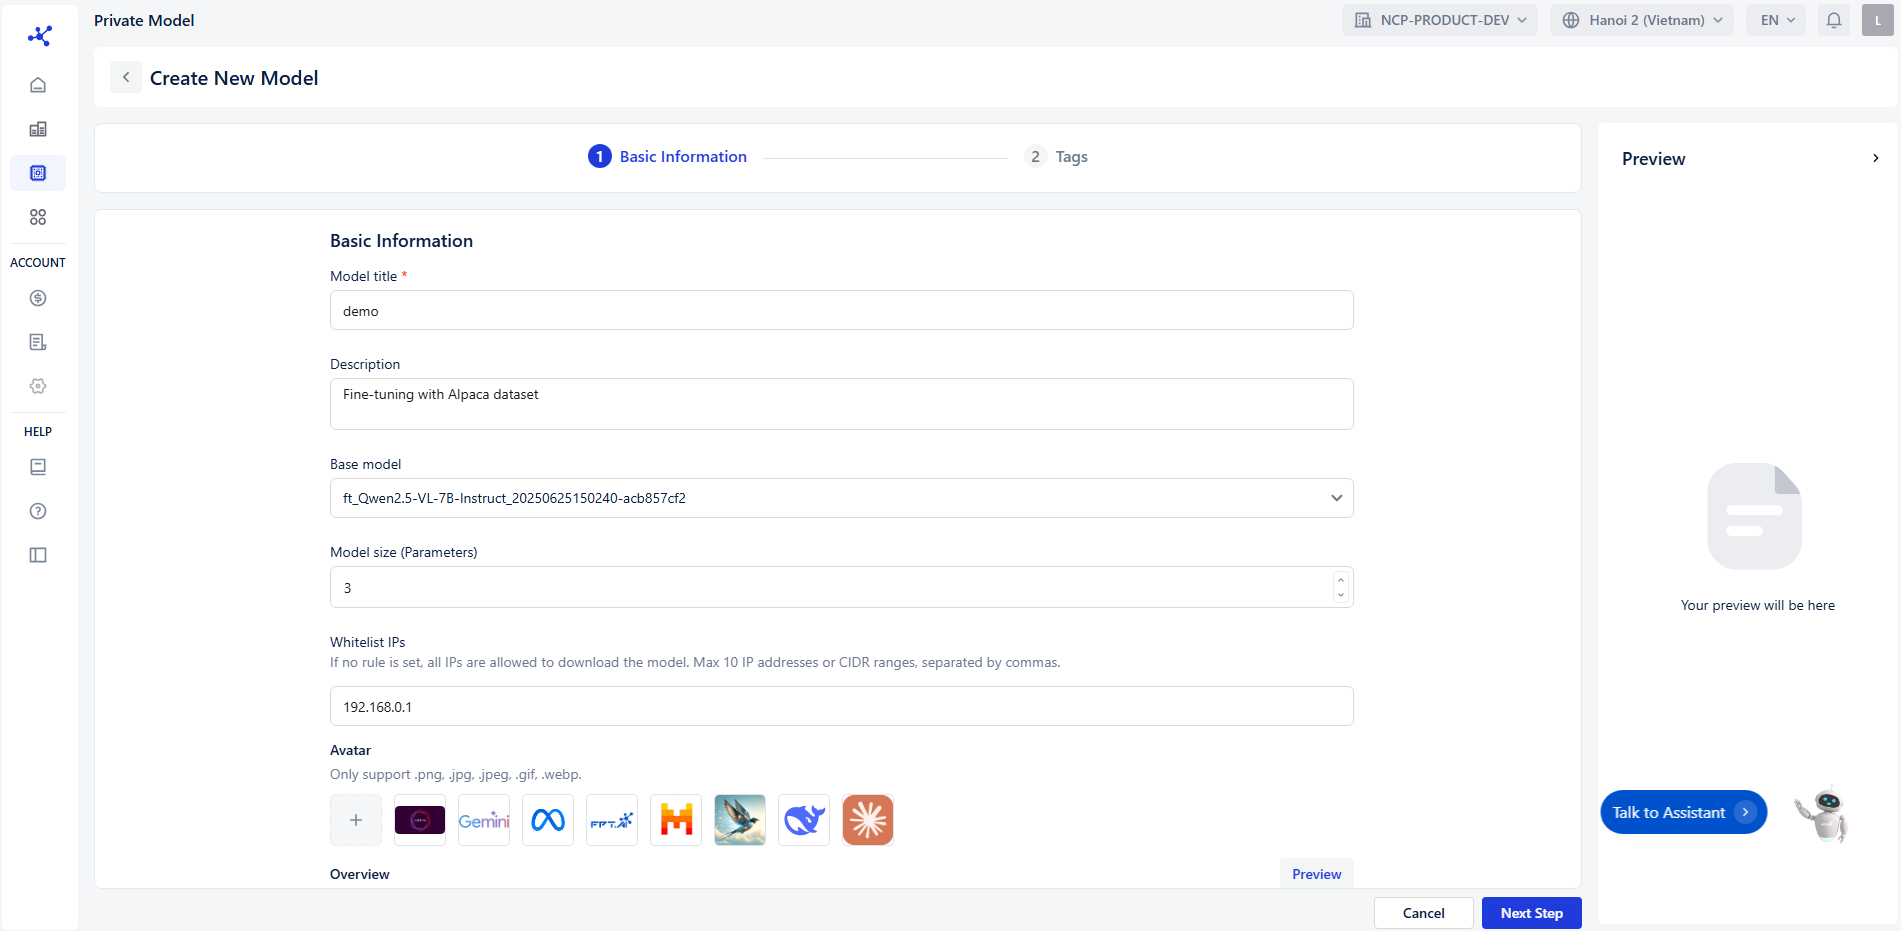
In the **Basic Information** section, complete the following fields:
* **Model Title**: Enter the name of your model (required).
* **Description**: Provide a short description of the model’s purpose.
* **Base Model**: Select the foundational model (e.g., GPT-4, LLaMA).
* **Model Size (Parameters)**: Specify the model’s parameter size (e.g., 7B, 13B).
* **Whitelist IPs**: Add IP addresses that are allowed to access the model.
* If no rule is set, all IPs are allowed to download the model. Max 10 IP addresses or CIDR ranges, separated by commas
* IPv4 format:
* x.x.x.x, where each x ∈ \[0, 255]
* Optional CIDR suffix: /y, where y ∈ \[0, 32]
✅ Valid: 192.168.0.0 ❌ Invalid: 192.168.300.1
* **Avatar**: Upload an image to represent your model (optional).
* **Overview**: Write a detailed overview using rich text formatting (bold, italic, lists, etc.).
#### **Step 2: Add Tags**
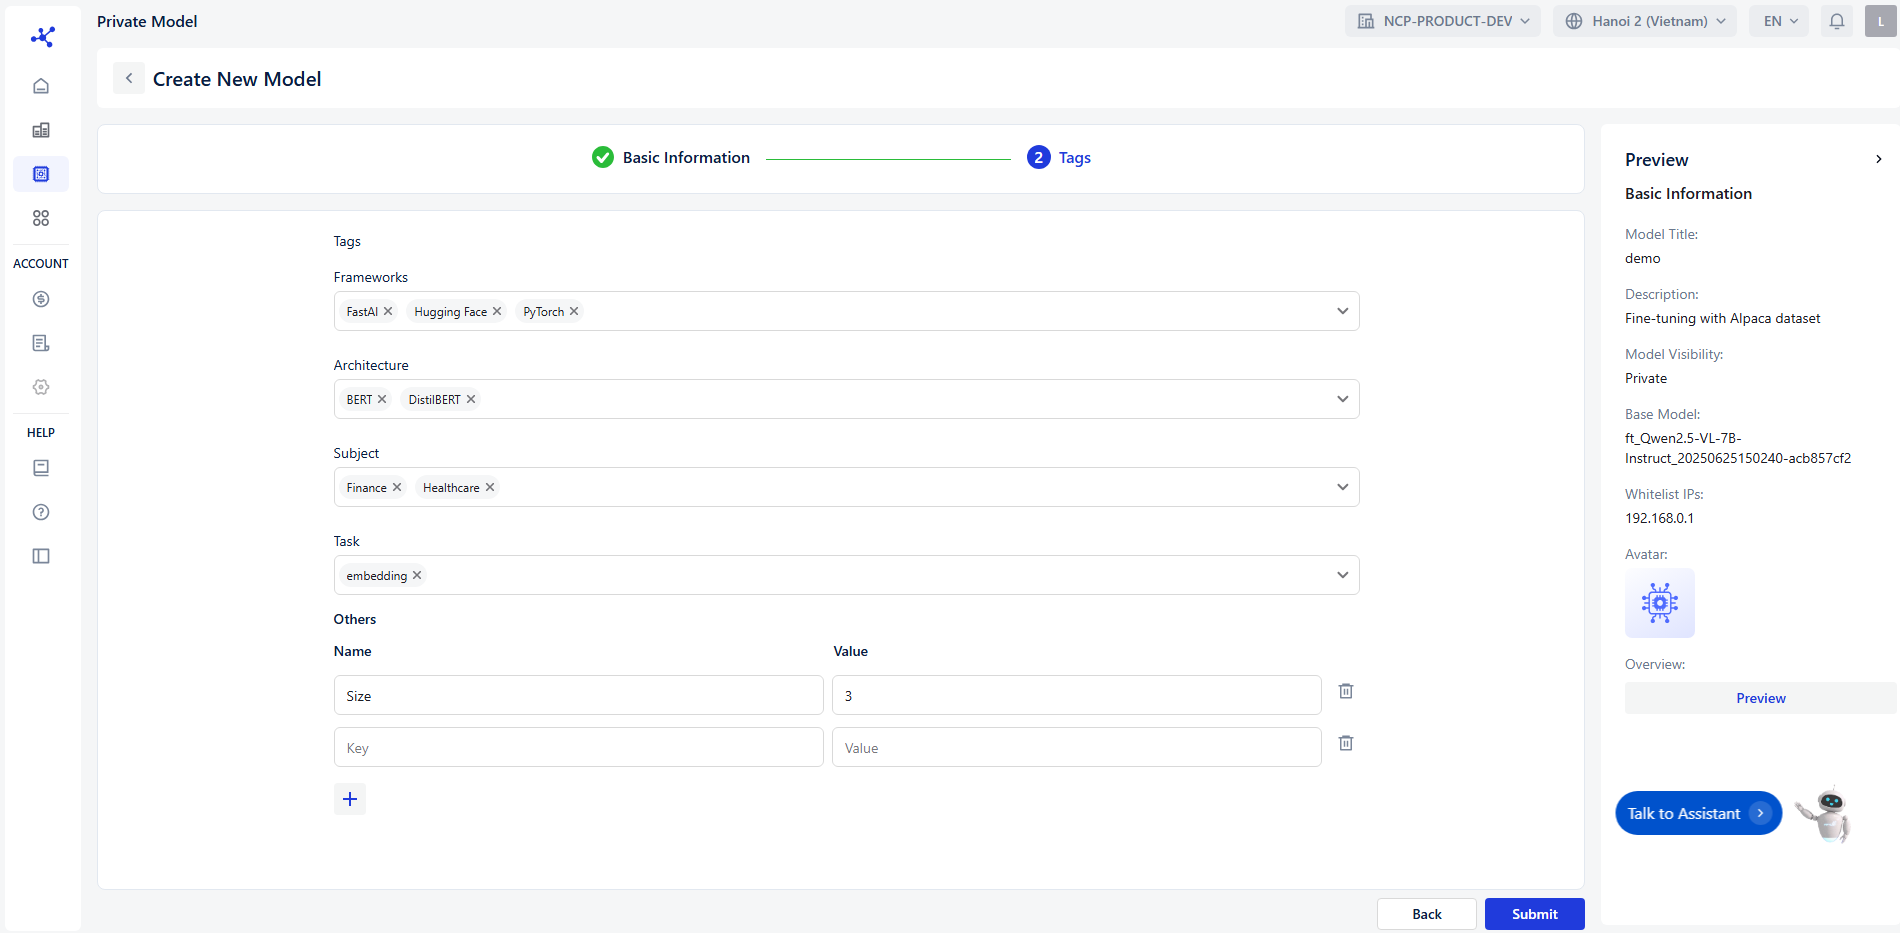
Use the **Tags** section to assign relevant keywords to your model for easier categorization and searchability.
**Tag Categories**
You can assign tags under the following predefined categories:
* **Frameworks**: Specify the development framework used (e.g., PyTorch, TensorFlow).
* **Architecture**: Define the model architecture (e.g., Bert, DistillBert, EfficientNet).
* **Subject**: Indicate the domain or field the model is related to (e.g., Healthcare, Finance, Education).
* **Task**: Describe the model’s primary function (e.g., Text Classification, Image Classification, Embedding).
* **Others**: Add any additional tags that don’t fit the above categories.
#### **Step 3: Preview**
The **Preview** panel on the right will display a live preview of your model based on the information you’ve entered.
#### **Step 4: Navigation**
* Click **Cancel** to discard changes and exit.
* Click **Submit** to finalize and create the model.
### View list Models
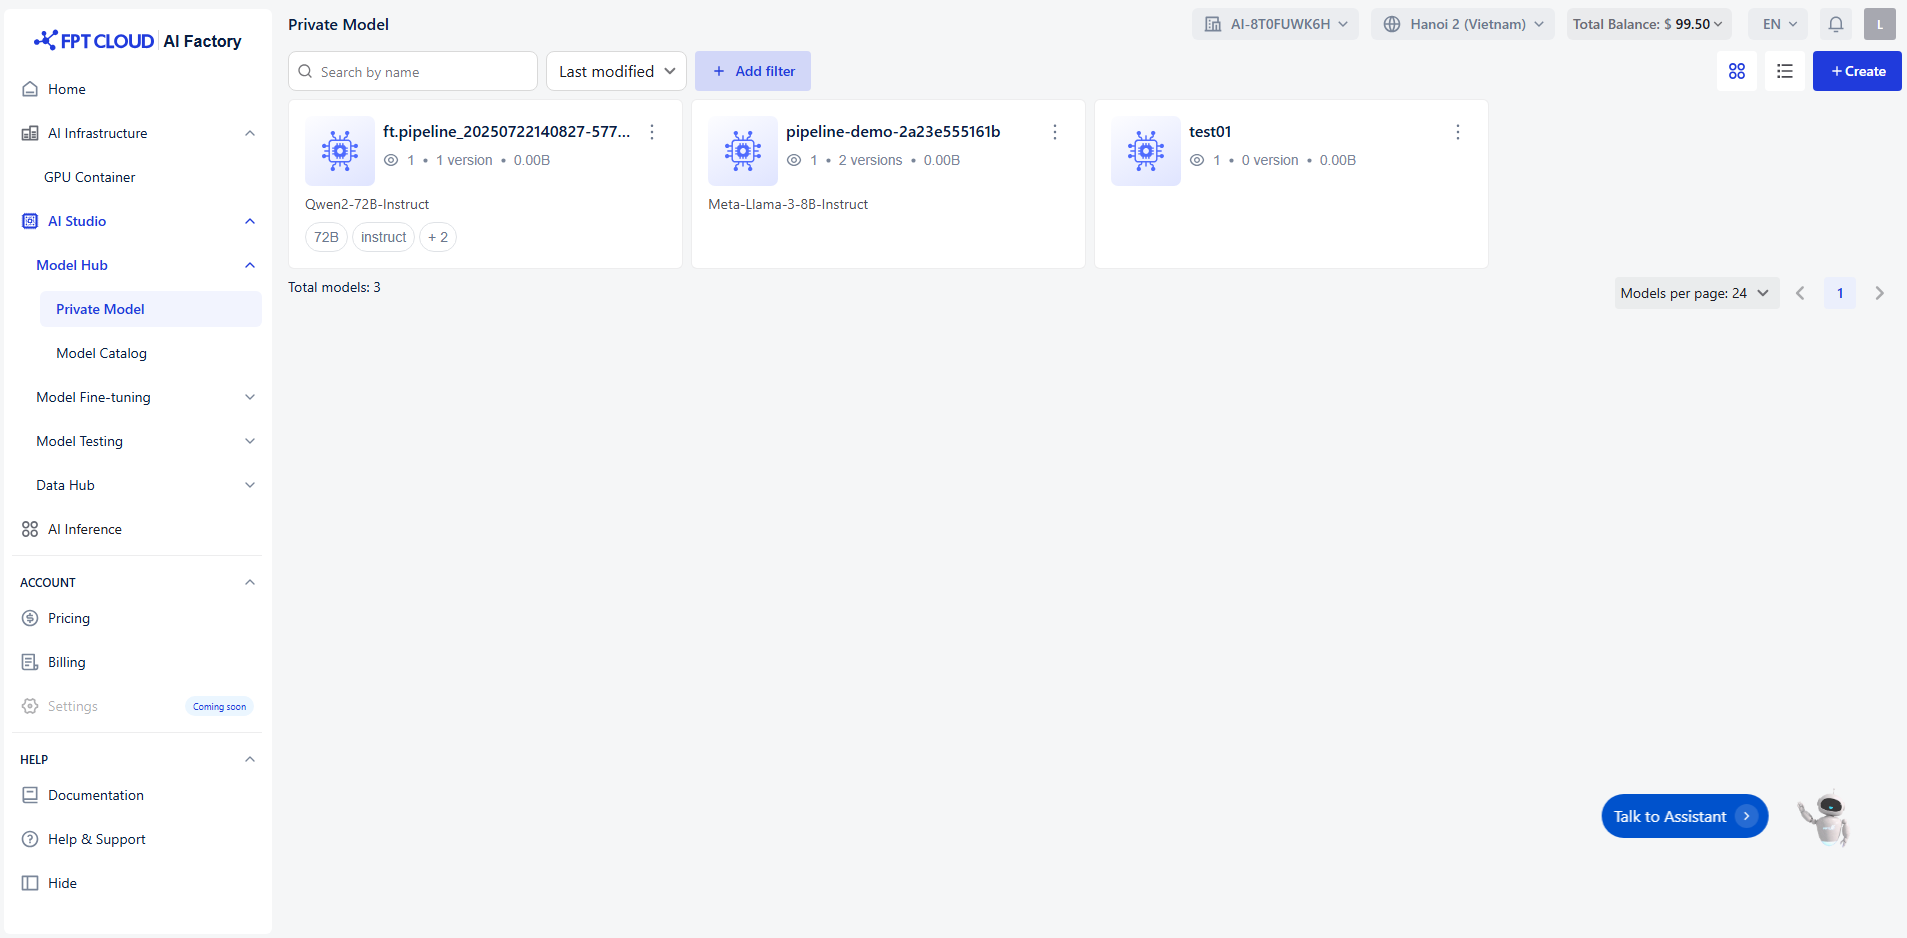
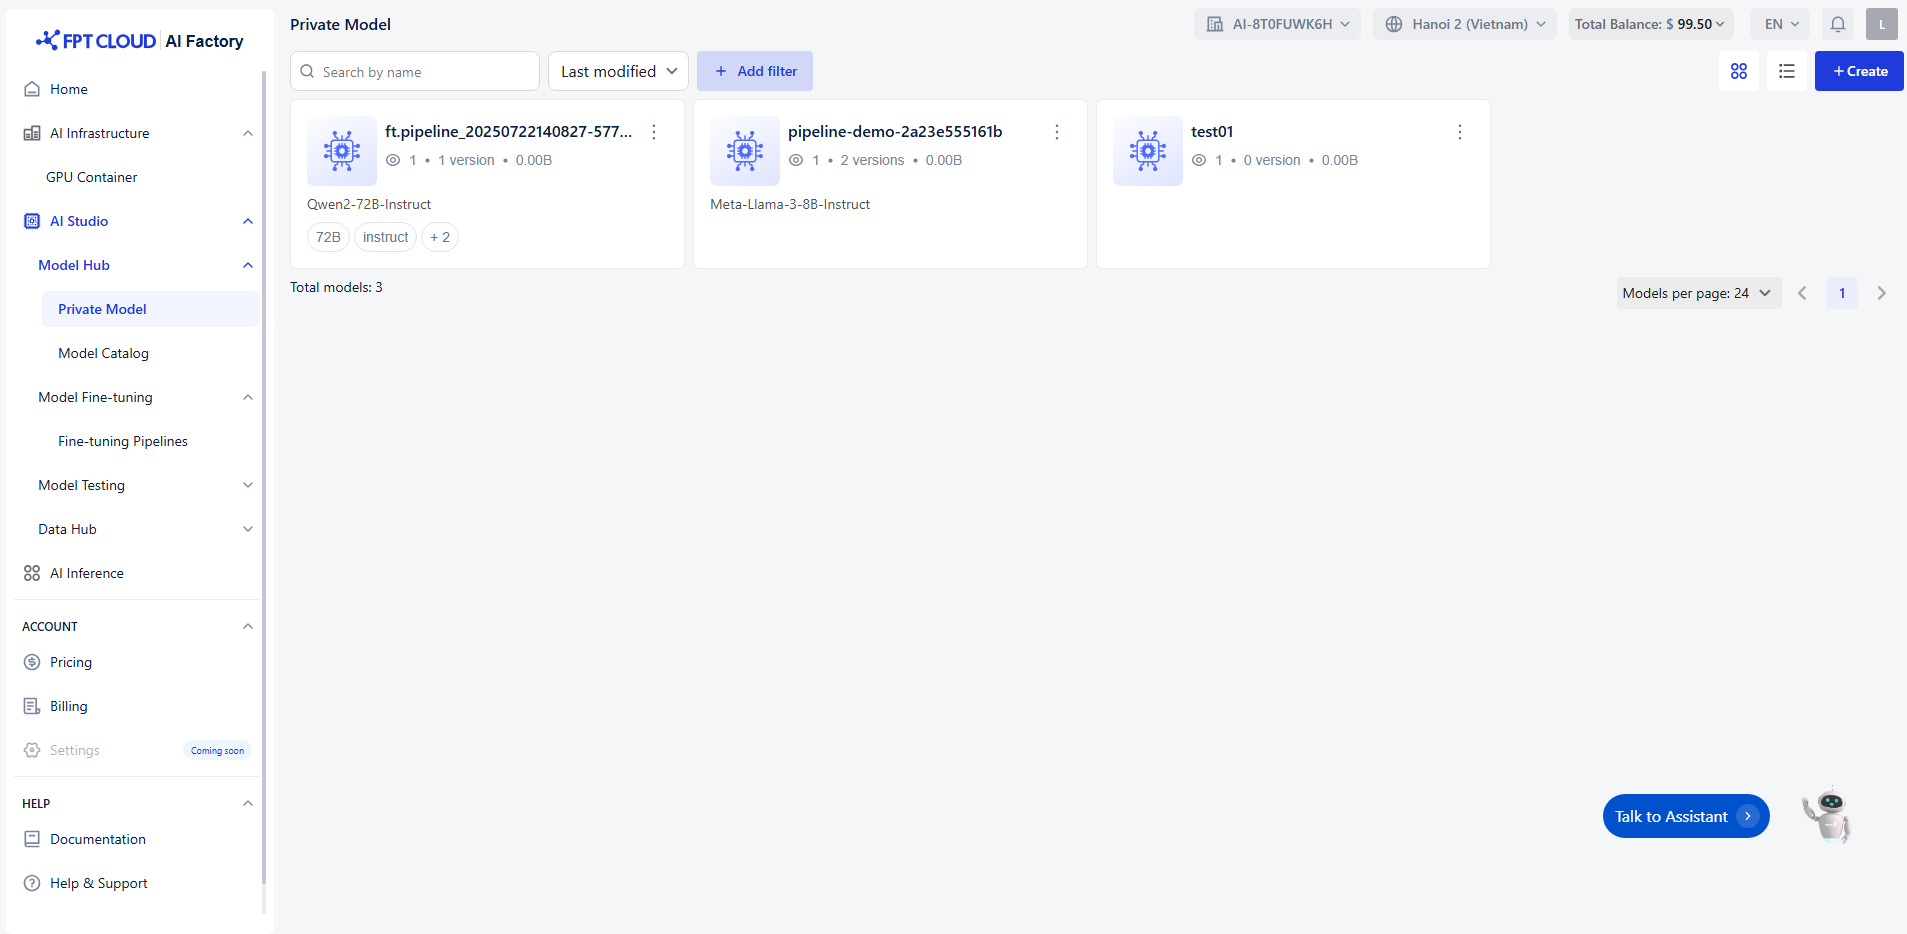
Each model card shows:
* **Model name** (e.g., `pipeline-demo-xxxx`)
* **Base model** used (e.g., `Qwen2-72B-Instruct`, `Meta-Llama-3-8B-Instruct`)
* **Number of versions**
* **Model size** (storage usage)
* **Access & usage info** (e.g., number of viewers)
Click the **three-dot menu (⋮)** on a model card to access more actions such as:
* **Playground**
Test the model directly in the Playground interface. You can interact with it before deployment.
* **Create API Endpoint**
Generate an API endpoint for the model so it can be integrated into your applications or services.
* **Fine-tune**
Customize the model using your own dataset to improve performance for your specific use case.
* **Delete**
Delete a model
**Browsing and Filtering Models**
* Use the **search bar** (top left) to quickly find a model by name.
* Use the **filter menu** to sort models by:
* **Last modified**
* **Model size**
* **Other attributes** (you can add filters by clicking **+ Add filter**).
* Adjust **Models per page** (bottom right) to show 4, 8, or more models.
### View Model Details
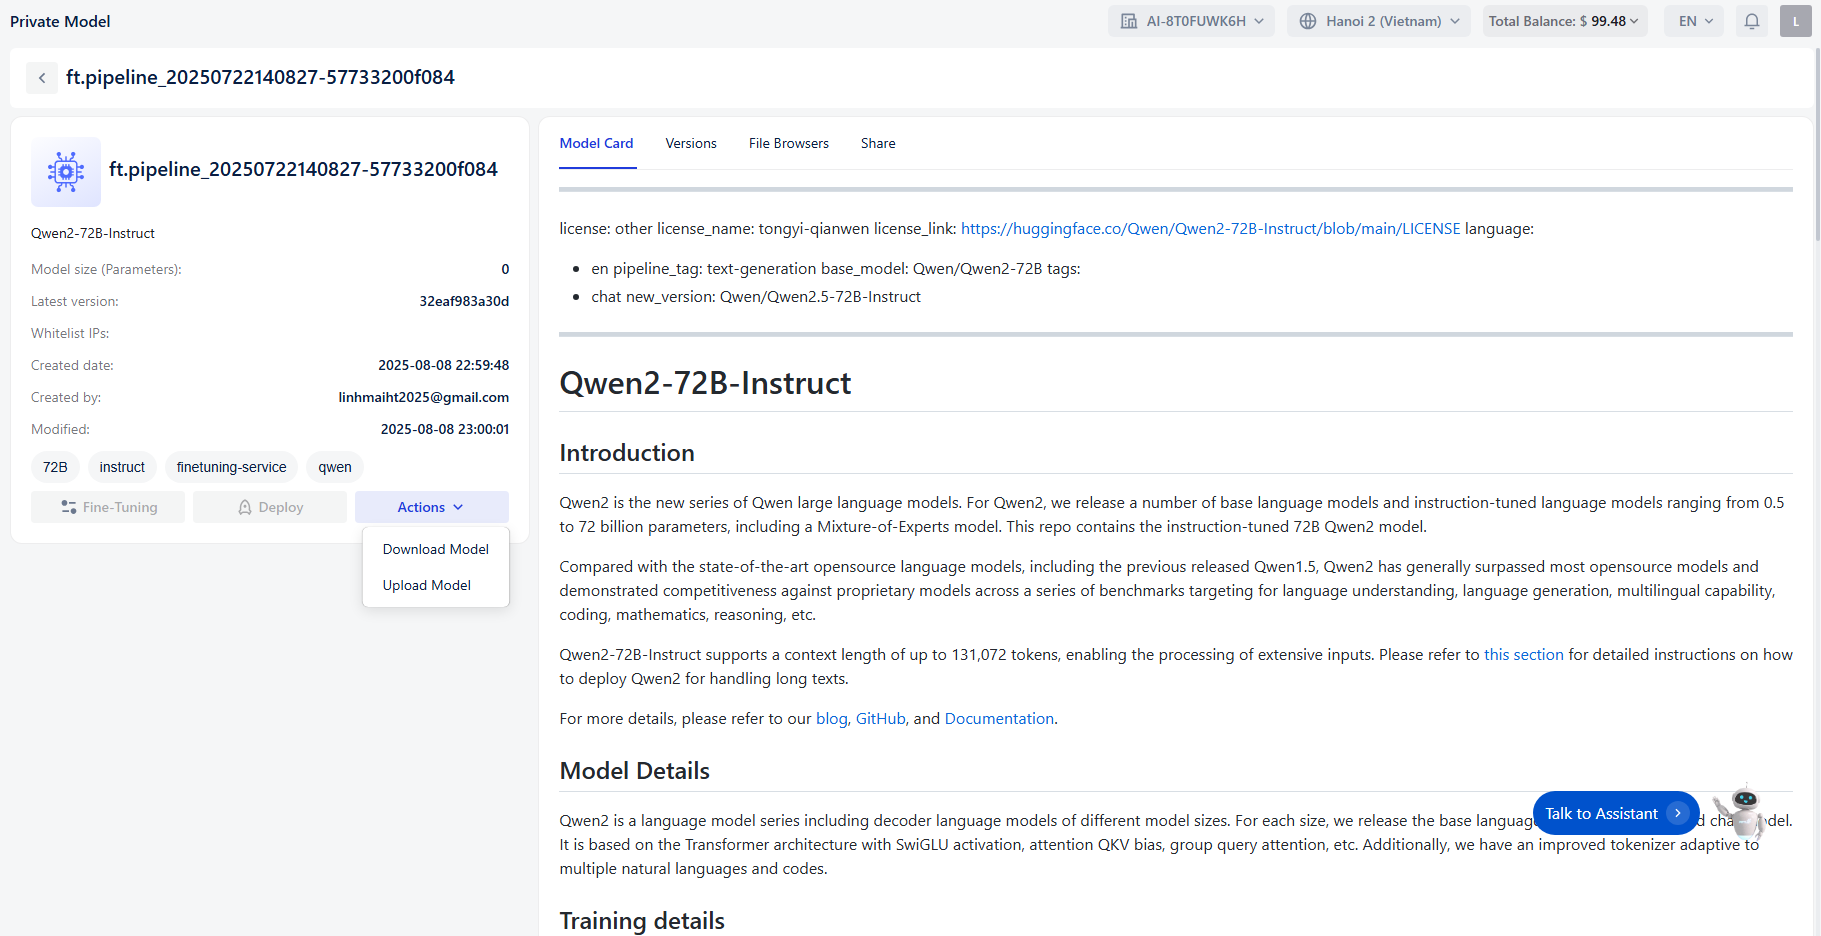
A model includes the following components:
* **Model title:** The name of the model
* **Base model:** The base model used
* **Model size (Parameters):** The total size of the model
* **Latest version**: The most recent version, created closest to the time of viewing details
* **Created date:** The date the model was created
* **Created by:** The user account that created the model
* **Modified**: The most recent date the model information was updated
* **Tags**: Tags associated with the model
* **Actions**: Available actions for the model
* Fine-Tuning
* Deploy
* Download Model
* Upload Model
#### **Model card**
Model card: Overview information about the model
#### **Versions**
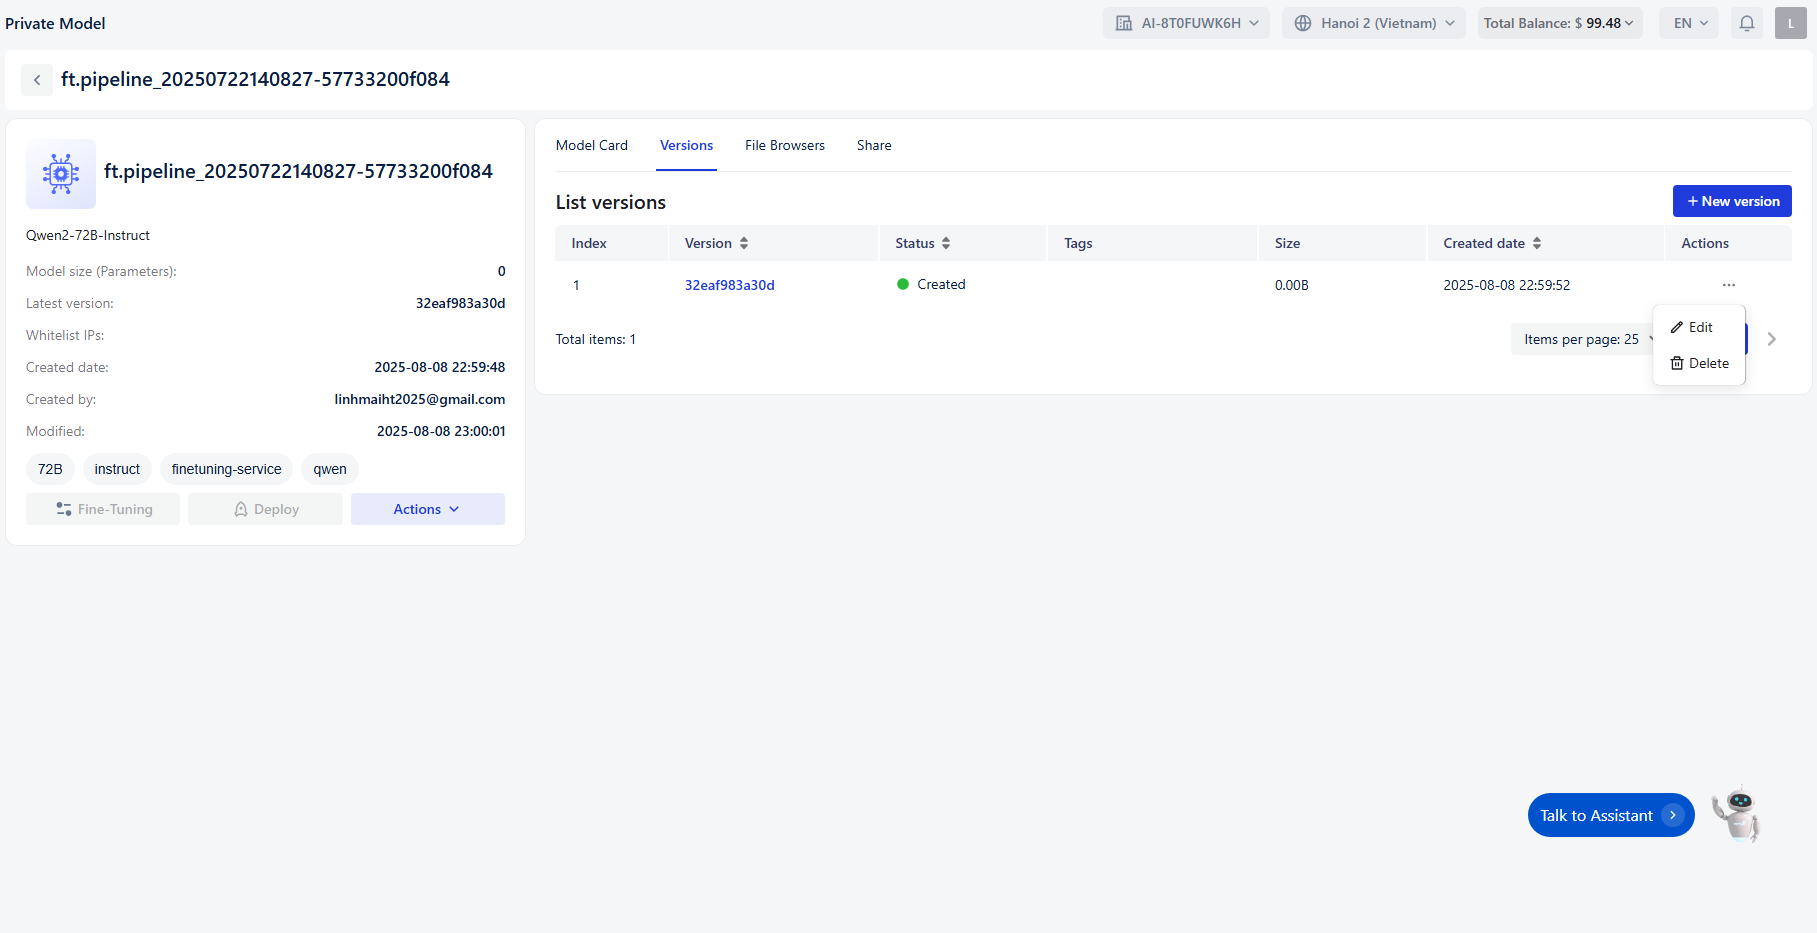
* **Index**: The order number of the version.
* **Version**: Unique identifier for the version (clickable for more details).
* **Status**: Current state of the version (e.g., *Created*, *Training*, *Deployed*), indicated with a colored dot.
* **Tags**: Optional labels for categorization.
* **Size**: File size of the version.
* **Created Date**: Timestamp of when the version was created.
* **Actions**: Options to interact with the version (e.g., edit, delete).
#### **File Browsers:**
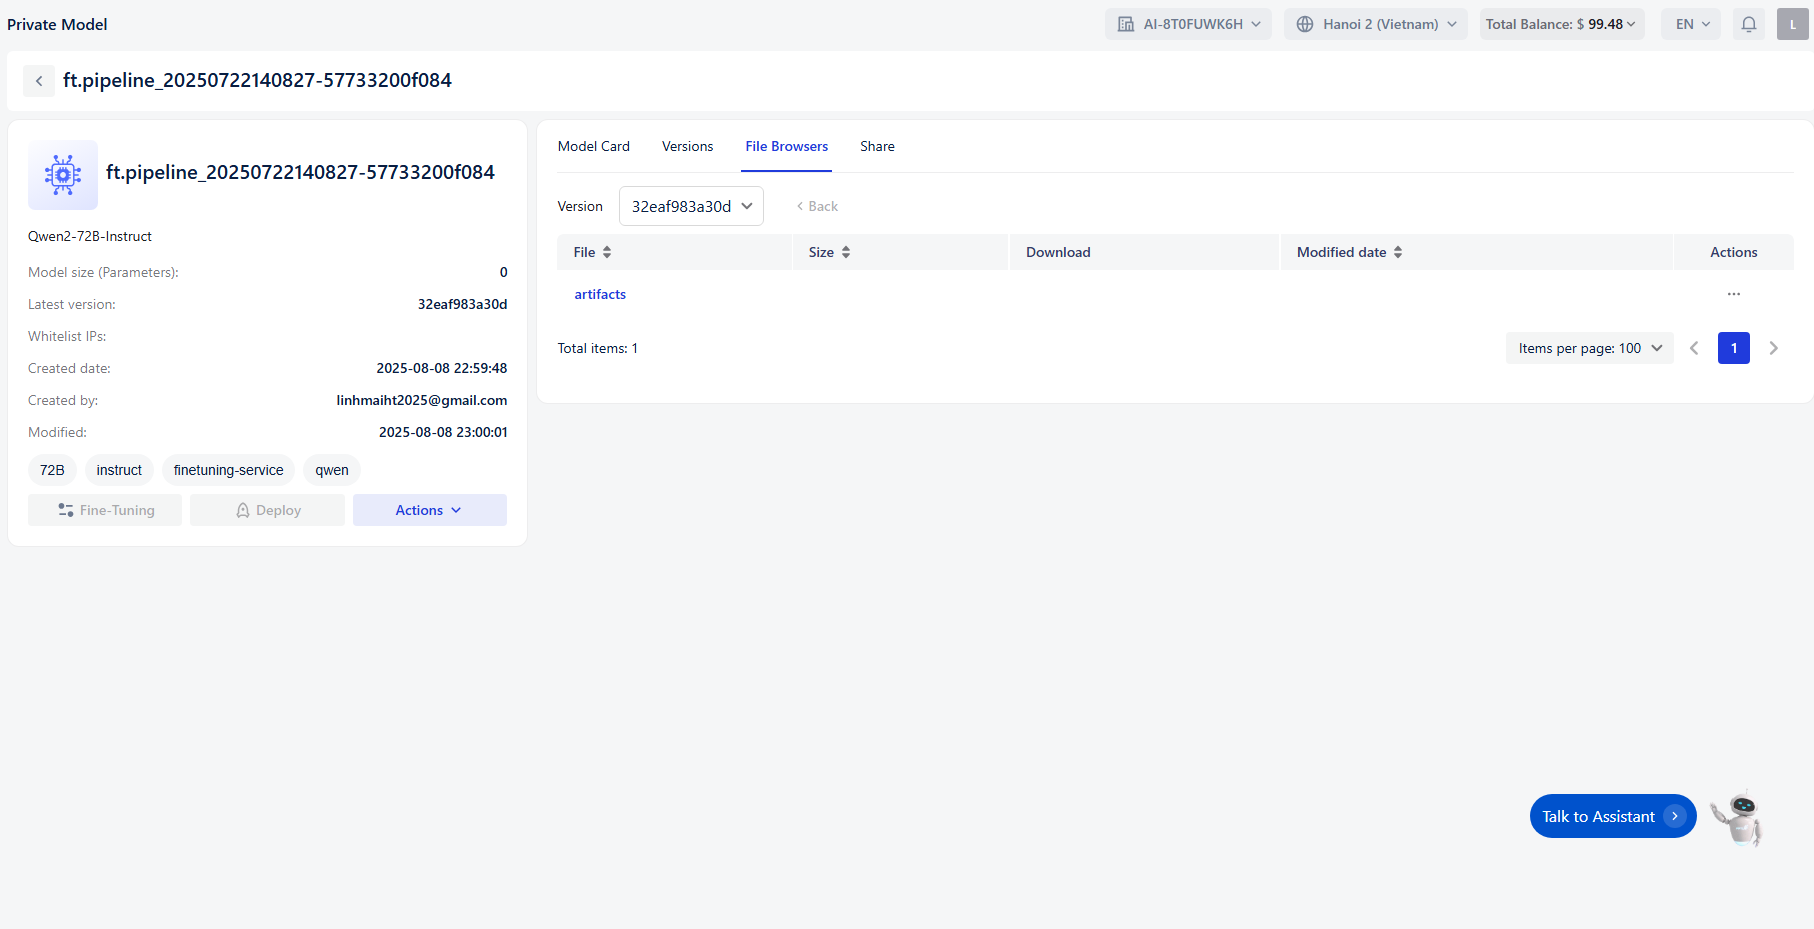
Displays the uploaded files corresponding to each version
* **File**: Name of the file or folder (e.g., `artifacts`).
* **Size**: File size.
* **Download**: Option to download the file.
* **Modified Date**: Timestamp of the last modification.
#### **Share**
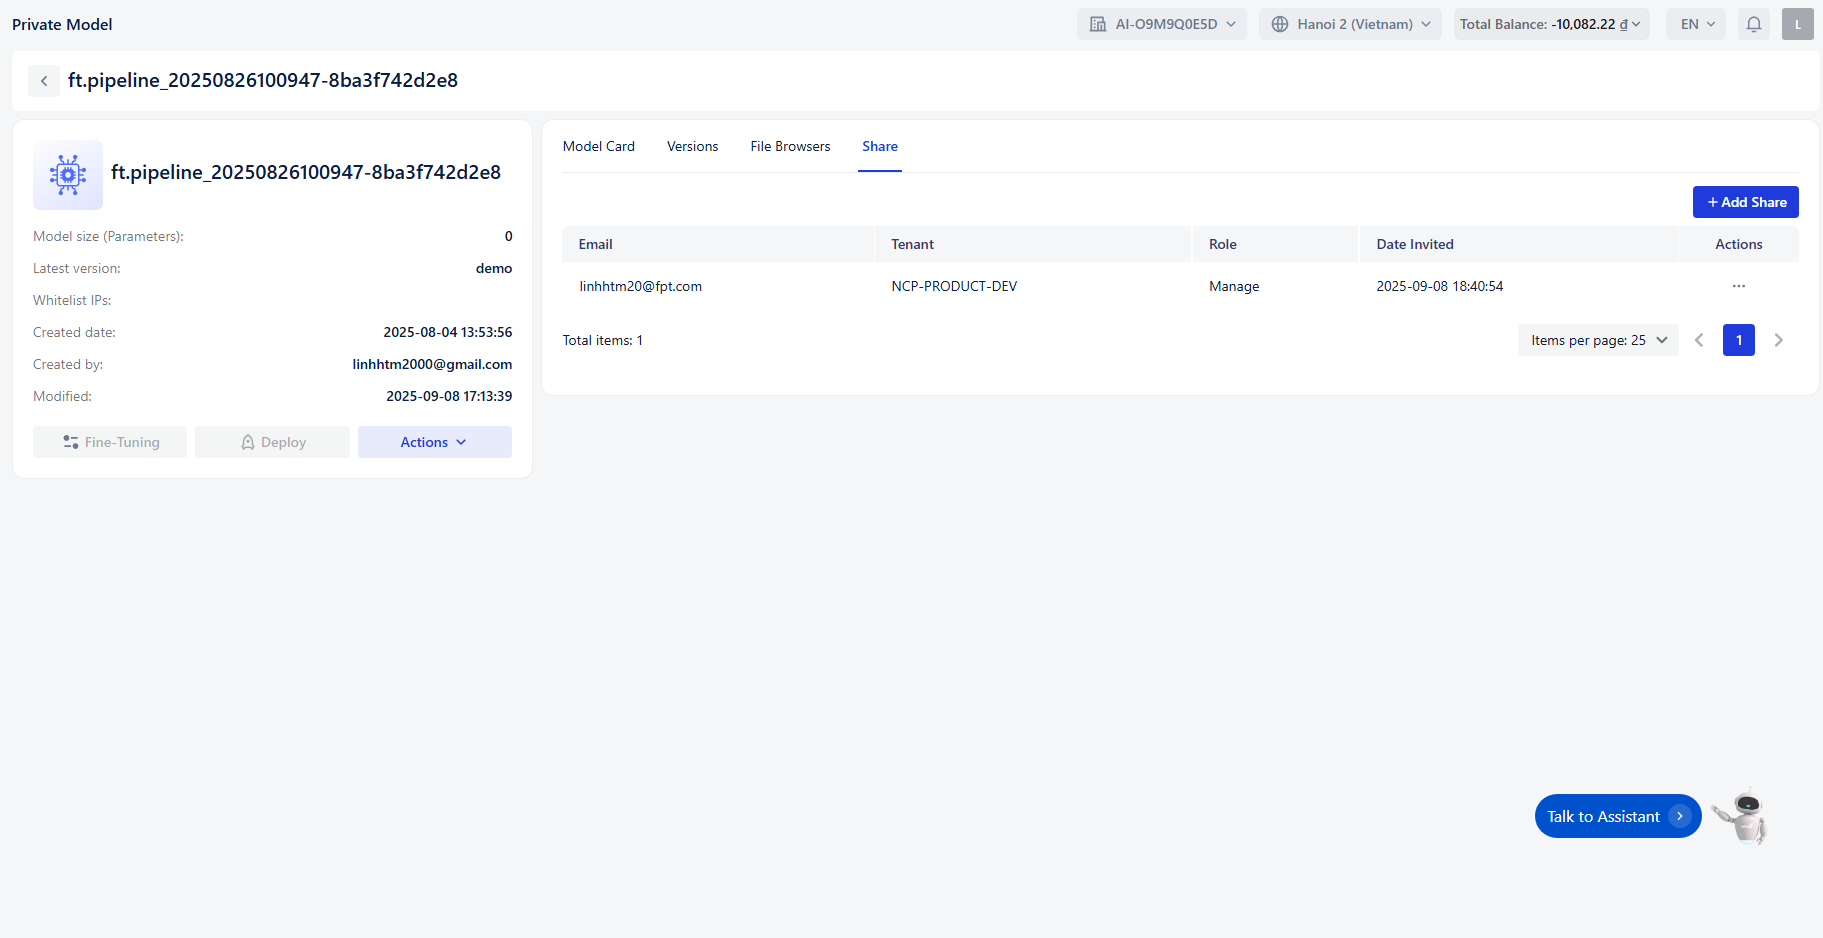
Allows sharing the model with others
* **Email**: The email address of the person the model is shared with
* **Tenant**: The tenant associated with the owner’s email
* **Role**: The role of the person the model is shared with
* **Date invited**: The date the user was added to the model
* **Action**: Options to update or remove the user from the model
### Edit Model
**Edit Model** allows users to update the details of an existing private model, including its metadata, configuration, and access settings.
#### **Step 1: Locate Your Model**
* Use the **search bar** at the top to find your model by name or keyword.
* Apply **filters** (e.g., version, size, tags) to narrow down the list.
#### **Step 2: Select the Model**
* In the model list, each entry displays:
* **Model Name**
* **Version**
* **Size**
* **Tags**
* Click the **Edit** button next to the model you want to modify.
#### **Step 3: Editing the Model**
Once you click **Edit**, you’ll be taken to the model configuration interface where you can:
* **Update Basic Information**: Change the title, description, base model, size, avatar, and whitelist IPs.
* **Modify Tags**: Add, remove, or update tags under categories like Frameworks, Architecture, Subject, Task, and Others.
* **Preview Changes**: Use the preview panel to review updates before saving.
#### **Step 4: Finalizing Changes**
* Click **Submit** to save your edits.
* Use **Back** to return without saving.
### Delete a Model
**Delete a model** allows user to delete from the list of created models
#### **Step 1: Locate Your Model**
* Use the **search bar** at the top to find your model by name or keyword.
* Apply **filters** (e.g., version, size, tags) to narrow down the list.
#### **Step 2: Select the Model**
* In the model list, each entry displays:
* **Model Name**
* **Version**
* **Size**
* **Tags**
* Click the **Delete** button next to the model you want to delete.
#### **Step 3: Delete the Model**
Once you click **Delete**, a confirmation dialog will appear. To confirm deletion, type "**confirm**" into the text box. The **Confirm** button will become enabled once you enter the text.
#### **Step 4**: Finalizing Changes
* Click the **Confirm** button to delete the model
* Click **Cancel** to cancel the action.
---
# Agent Instructions
This documentation is published with GitBook. GitBook is the documentation platform designed so that both humans and AI agents can read, navigate, and reason over technical content effectively. Learn more at gitbook.com.
## Querying This Documentation
If you need additional information that is not directly available in this page, you can query the documentation dynamically by asking a question.
Perform an HTTP GET request on the current page URL with the `ask` query parameter, and the optional `goal` query parameter:
```
GET https://ai-docs.fptcloud.com/fpt-ai-studio/services/model-hub/tutorials/how-to-use-private-model.md?ask=&goal=
```
`ask` is the immediate question: it should be specific, self-contained, and written in natural language.
`goal` is optional and describes the broader end goal you are ultimately trying to accomplish on behalf of the user. GitBook uses it to tailor the answer towards what is most useful for that goal.
The response will contain a direct answer to the question and relevant excerpts and sources from the documentation.
Use this mechanism when the answer is not explicitly present in the current page, you need clarification or additional context, or you want to retrieve related documentation sections.