# Floating IPs

## Overview <a href="#floatingips-overview" id="floatingips-overview"></a>

A **Floating IP** (also known as a **Public IP**) is a publicly accessible **static IPv4 address**.\
You can **assign or reassign** a reserved Floating IP to a **GPU Virtual machine** to make it reachable from the internet.\
The Floating IP can be **removed at any time** when external access is no longer required.

## Attach Floating IPs <a href="#floatingips-attachfloatingips" id="floatingips-attachfloatingips"></a>

After successfully creating a **GPU VM**, you can assign a **Floating IP** (a **Public IP** that can be flexibly attached or detached) to make the instance accessible from the internet.

{% stepper %}
{% step %}

### Access the Allocate IP Address Feature

You can allocate a Floating IP using one of the following methods:

{% tabs %}
{% tab title="Method 1" %}

* In the left-side menu, go to **Networking → Floating IPs**.
* Click **Allocate IP Address** to create a new Floating IP

  <figure><img src="https://fptcloud.com/wp-content/uploads/2024/12/12-1.png" alt=""><figcaption></figcaption></figure>

{% endtab %}

{% tab title="Method 2" %}

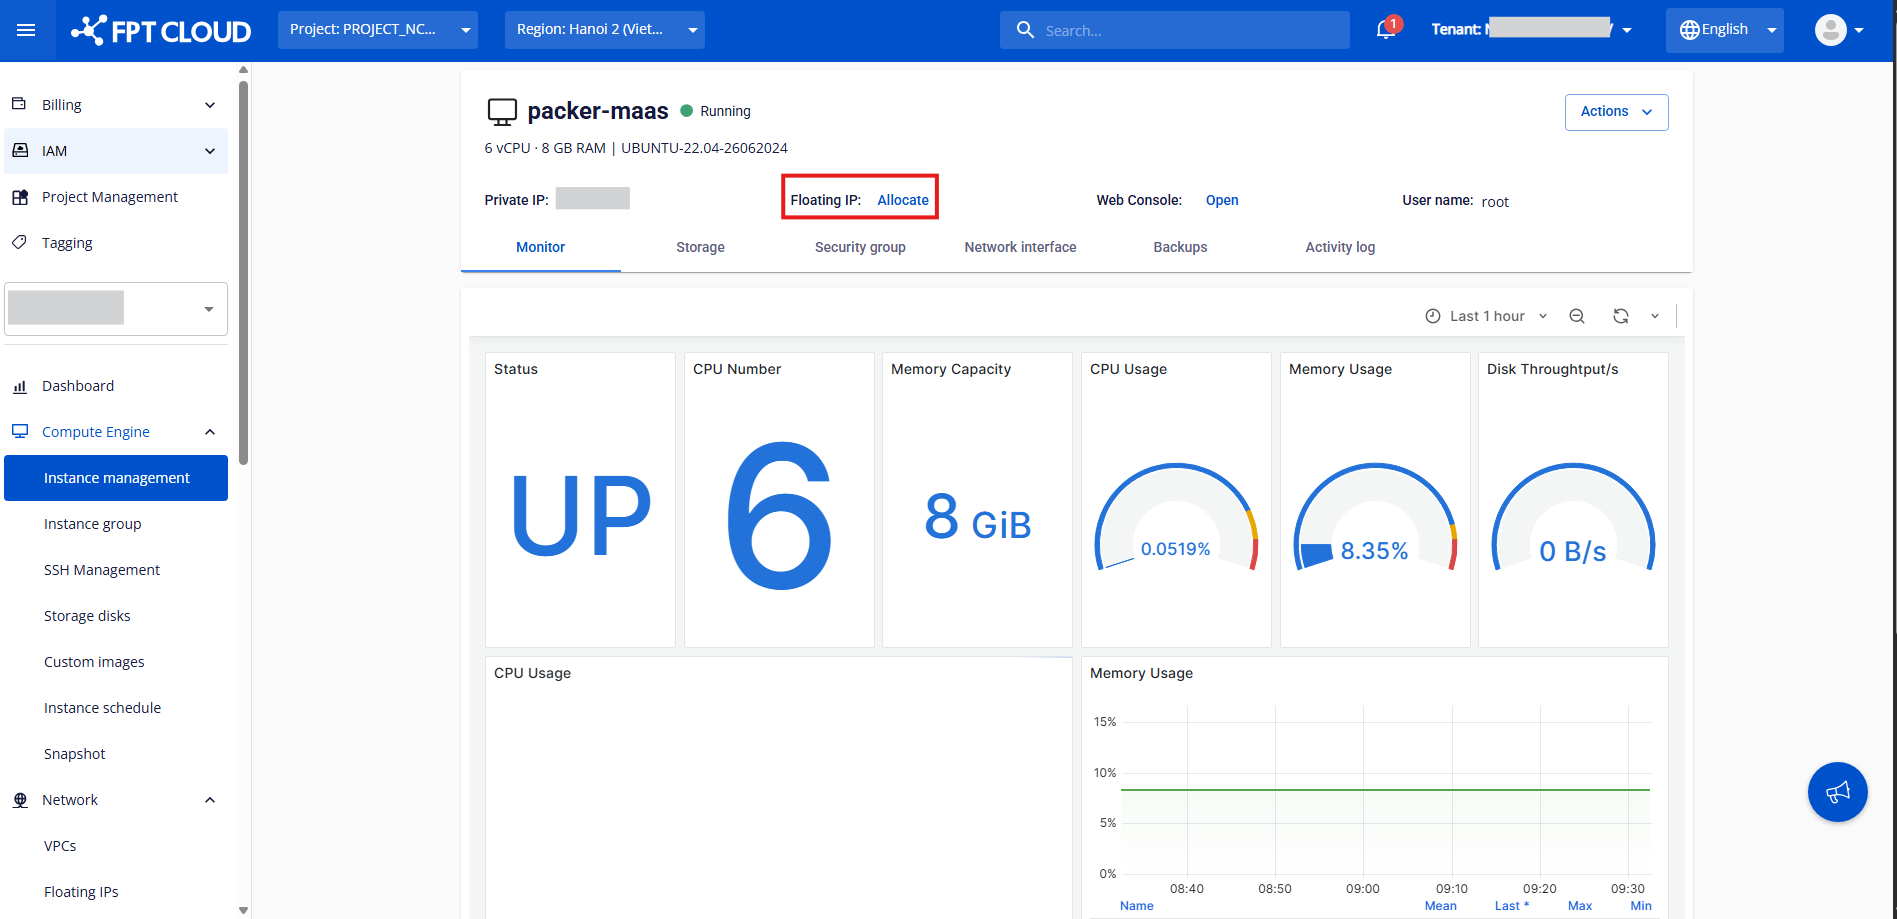
* In the left-side menu, go to **Instance Management**.
* Select the VM you want to assign a Floating IP to.
* Click the **Floating IP** button to allocate a new address.

<figure><img src="/files/njZJQ23SJeK4UbSc2WQF" alt=""><figcaption></figcaption></figure>
{% endtab %}
{% endtabs %}
{% endstep %}

{% step %}

### Fill in IP Address Information

After opening the **Allocate IP Address** feature, a pop-up window will appear prompting you to enter the necessary details for the IP address allocation.<br>

<figure><img src="/files/lKKG9hXMgyOFSNDuMBbU" alt=""><figcaption></figcaption></figure>

<table><thead><tr><th width="131.7999267578125">Fields</th><th>Description</th></tr></thead><tbody><tr><td><strong>IP Address</strong></td><td><ul><li>Select an available (reserved) IP, or</li><li>Choose <strong>Allocate new from pool</strong> to request a new IP (if your quota allows).</li></ul></td></tr><tr><td><strong>Resource</strong></td><td><p>Select <strong>Instance,</strong> then</p><ul><li>Choose <strong>the GPU VM name</strong> from the drop-down list to associate it with the Floating IP <br>*If you opened this pop-up from <strong>Instance Management</strong>, the VM field will be pre-filled automatically.</li><li>If you don’t need to attach the Floating IP to a virtual machine yet (for example, you plan to use it later), select <strong>Not assign IP to instance</strong>.</li></ul></td></tr><tr><td><strong>IP Port</strong></td><td><ul><li>The external port on the Floating IP is used to forward incoming traffic to the instance.</li><li>You can configure separate <strong>NAT rules</strong> for specific ports.</li><li>Each port on a single IP must be <strong>unique</strong> and cannot overlap with other rules.</li><li>If this field is left blank, the system will forward traffic on <strong>all ports by default</strong>.</li></ul></td></tr><tr><td><strong>Instance Port</strong></td><td><ul><li>The internal port on the instance that receives forwarded traffic.</li><li>You can also configure separate <strong>NAT rules</strong> for specific instance ports.</li><li>Each port on an instance must be <strong>unique</strong> and cannot overlap with other rules.</li><li>If this field is left blank, the system will forward traffic on <strong>all ports by default</strong>.</li></ul></td></tr><tr><td><strong>Add Tag</strong></td><td>Optional, to help with resource categorization and management.</td></tr></tbody></table>

{% hint style="warning" %}
If your GPU VM users an **Ephemeral (NVMe) disk**, the following **port setting are required**:

* **IP Port:** Recommended to match the **Instance Port (22)** for SSH access.
* **Instance Port:** Set to **22** for SSH access

You may repeat this step to add additional ports as needed.

If your GPU VM uses a **Block Storage - Persistent disk**, these port configurations are **optional**
{% endhint %}

{% endstep %}

{% step %}

### Confirm Allocation

After completing the required fields, click **Allocate Floating IP** to confirm.\
The newly created Floating IP will then appear in the list and can be attached to your VM.
{% endstep %}
{% endstepper %}

## Detach Floating IPs

If you no longer need to use a Floating IP or want to detach it to assign to another virtual machine, follow these steps:

{% stepper %}
{% step %}
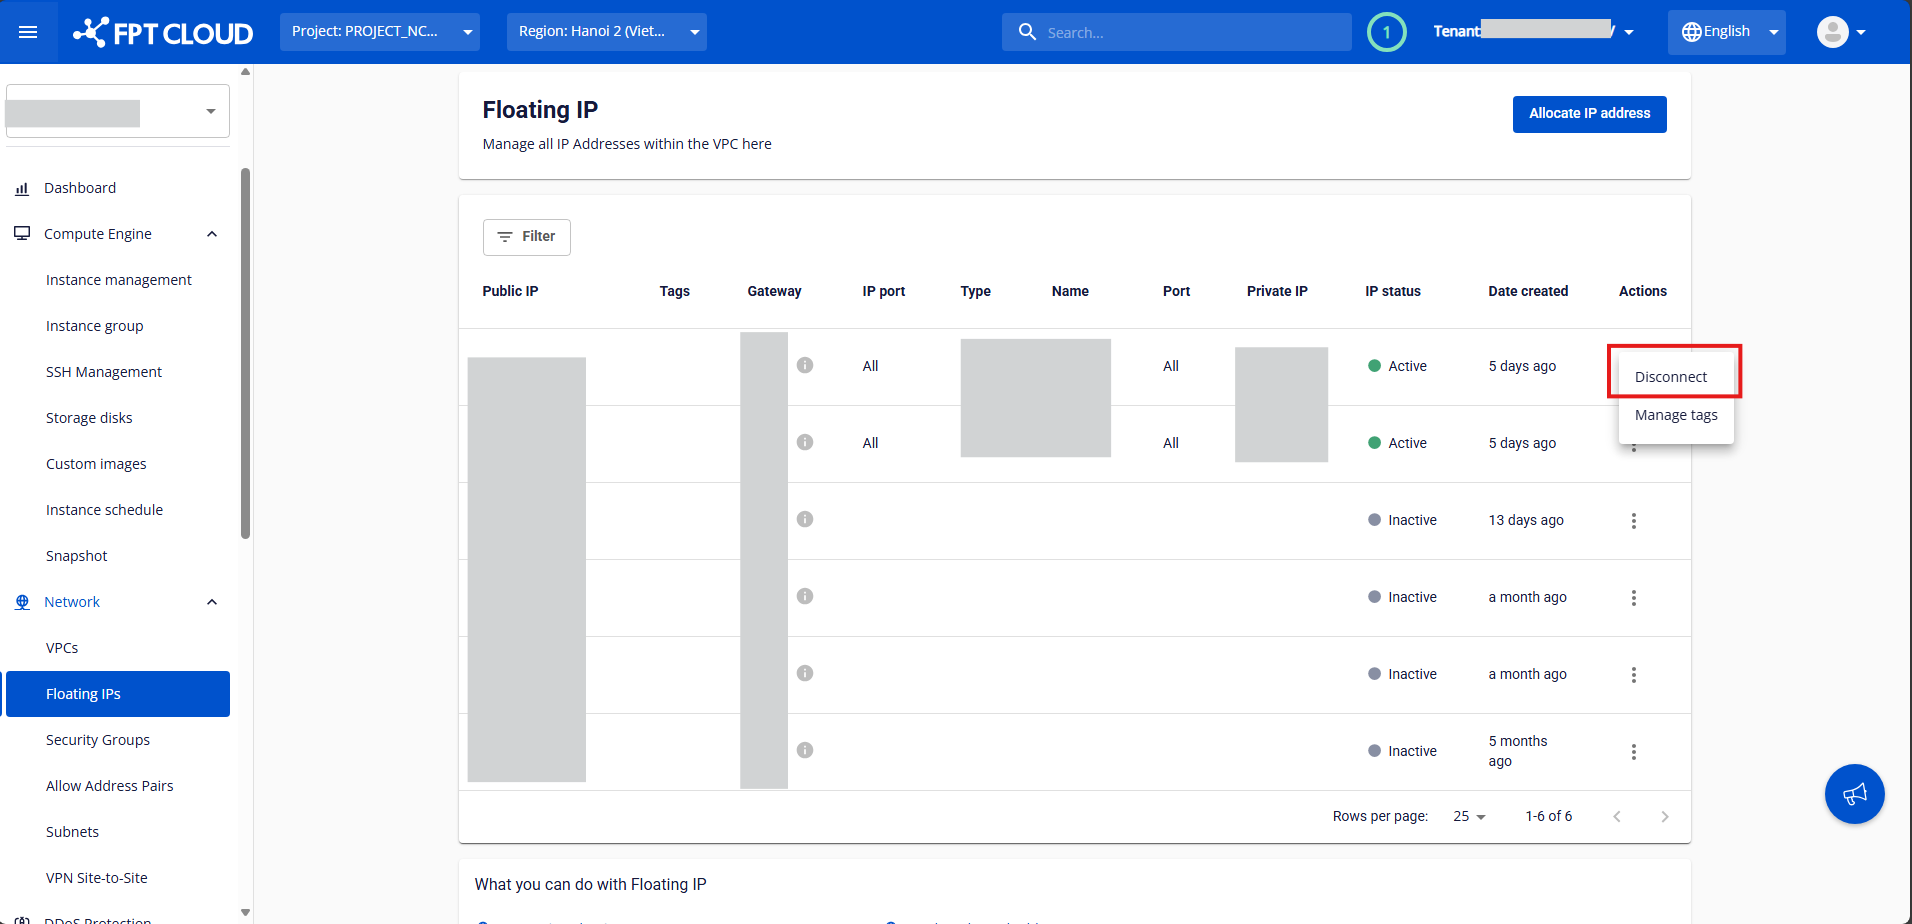
In the **Floating IP Management** page, locate the IP address you want to detach.\
Under the **Actions** column, select **Disconnect Instance**.

<figure><img src="/files/arfXQRemoFopLGPn1hTX" alt=""><figcaption></figcaption></figure>
{% endstep %}

{% step %}
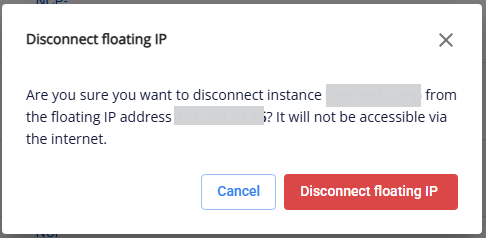
A confirmation pop-up will appear.\
To confirm the detachment, click **Disconnect**.

<figure><img src="/files/xumDvpHBdK3axW00AJYm" alt=""><figcaption></figcaption></figure>
{% endstep %}
{% endstepper %}

## Release Floating IPs from the VPC

If a Floating IP is no longer needed, you can release it from the VPC as follows:

{% stepper %}
{% step %}
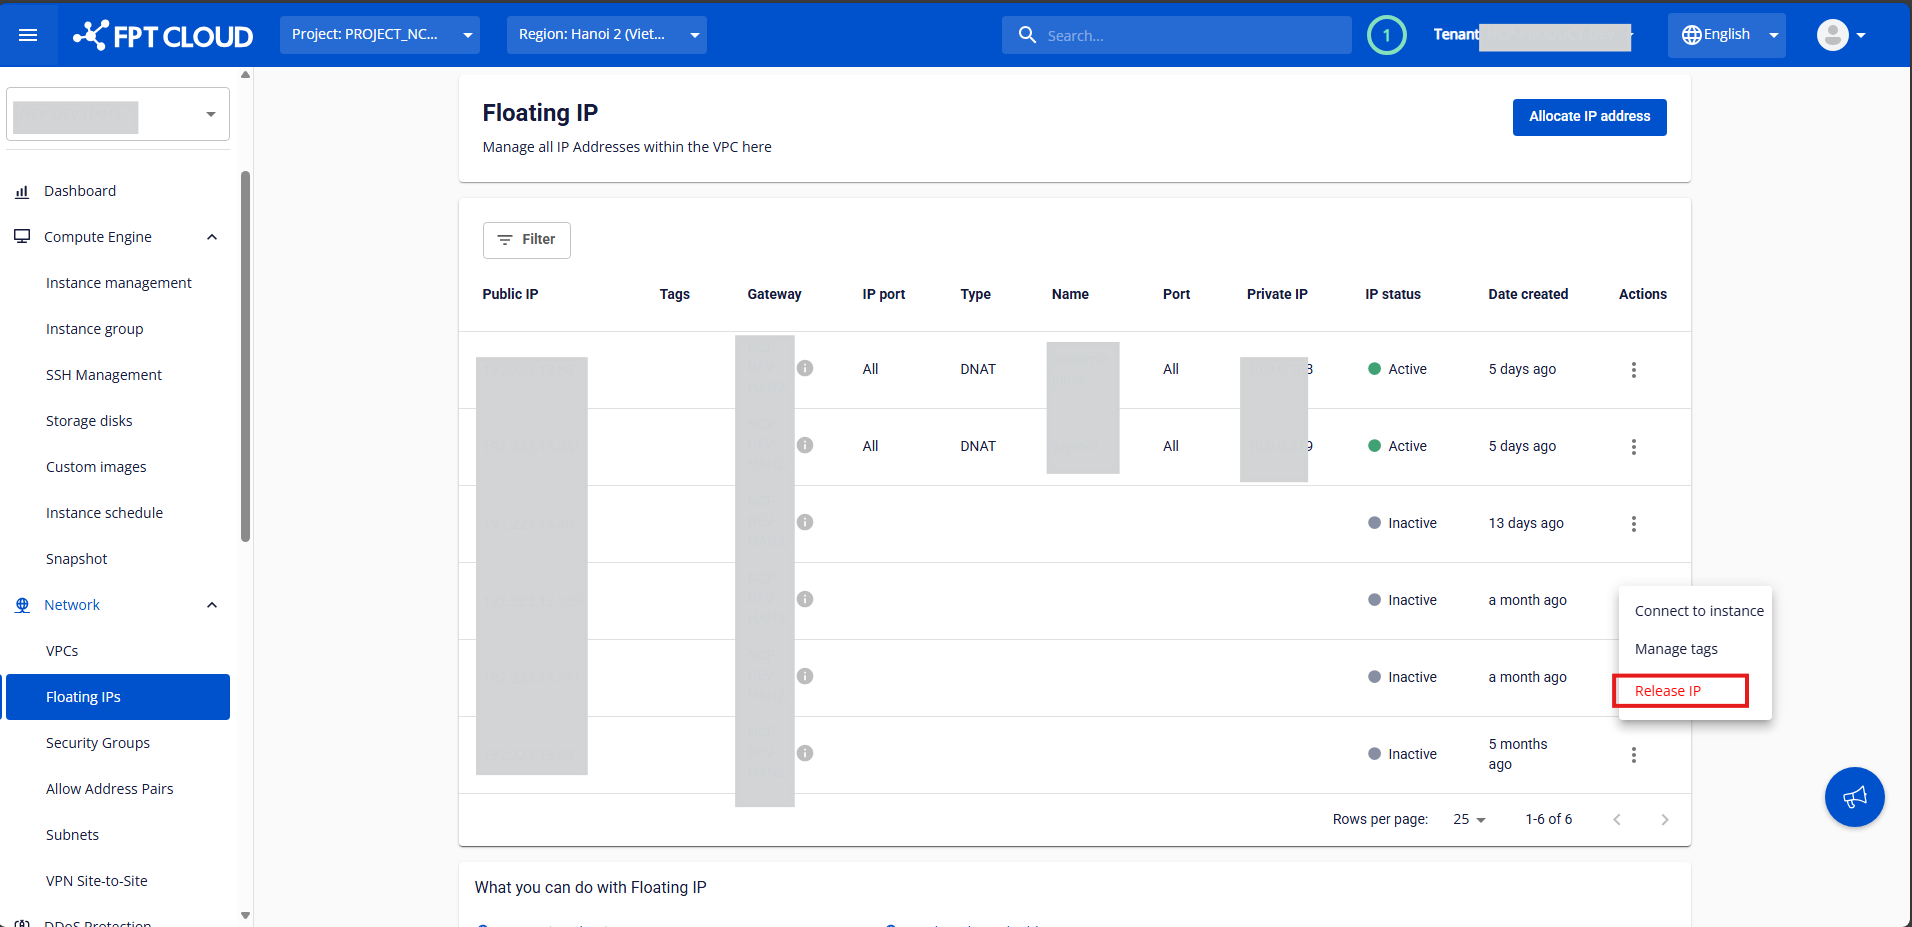
In the **Floating IP Management** page, locate the IP address you want to remove.\
Under the **Actions** column, select **Release IP**.

<figure><img src="/files/WToQ0Rxc7Uzw4nrBuX8a" alt=""><figcaption></figcaption></figure>
{% endstep %}

{% step %}
A confirmation pop-up will appear.\
To confirm the release, click **Release**.

<figure><img src="/files/eZFScAO2IuxqsyolfyS0" alt=""><figcaption></figcaption></figure>
{% endstep %}
{% endstepper %}


---

# Agent Instructions: Querying This Documentation

If you need additional information that is not directly available in this page, you can query the documentation dynamically by asking a question.

Perform an HTTP GET request on the current page URL with the `ask` query parameter:

```
GET https://ai-docs.fptcloud.com/fpt-gpu-cloud/gpu-virtual-machine/on-fpt-cloud-console/tutorials/floating-ips.md?ask=<question>
```

The question should be specific, self-contained, and written in natural language.
The response will contain a direct answer to the question and relevant excerpts and sources from the documentation.

Use this mechanism when the answer is not explicitly present in the current page, you need clarification or additional context, or you want to retrieve related documentation sections.