
How to Use Private Model?
Create Model
Create Model allows users to build a private AI model by customizing its basic settings, metadata, and access controls. On the Model Hub service screen, click the Create button to go to the creation page.
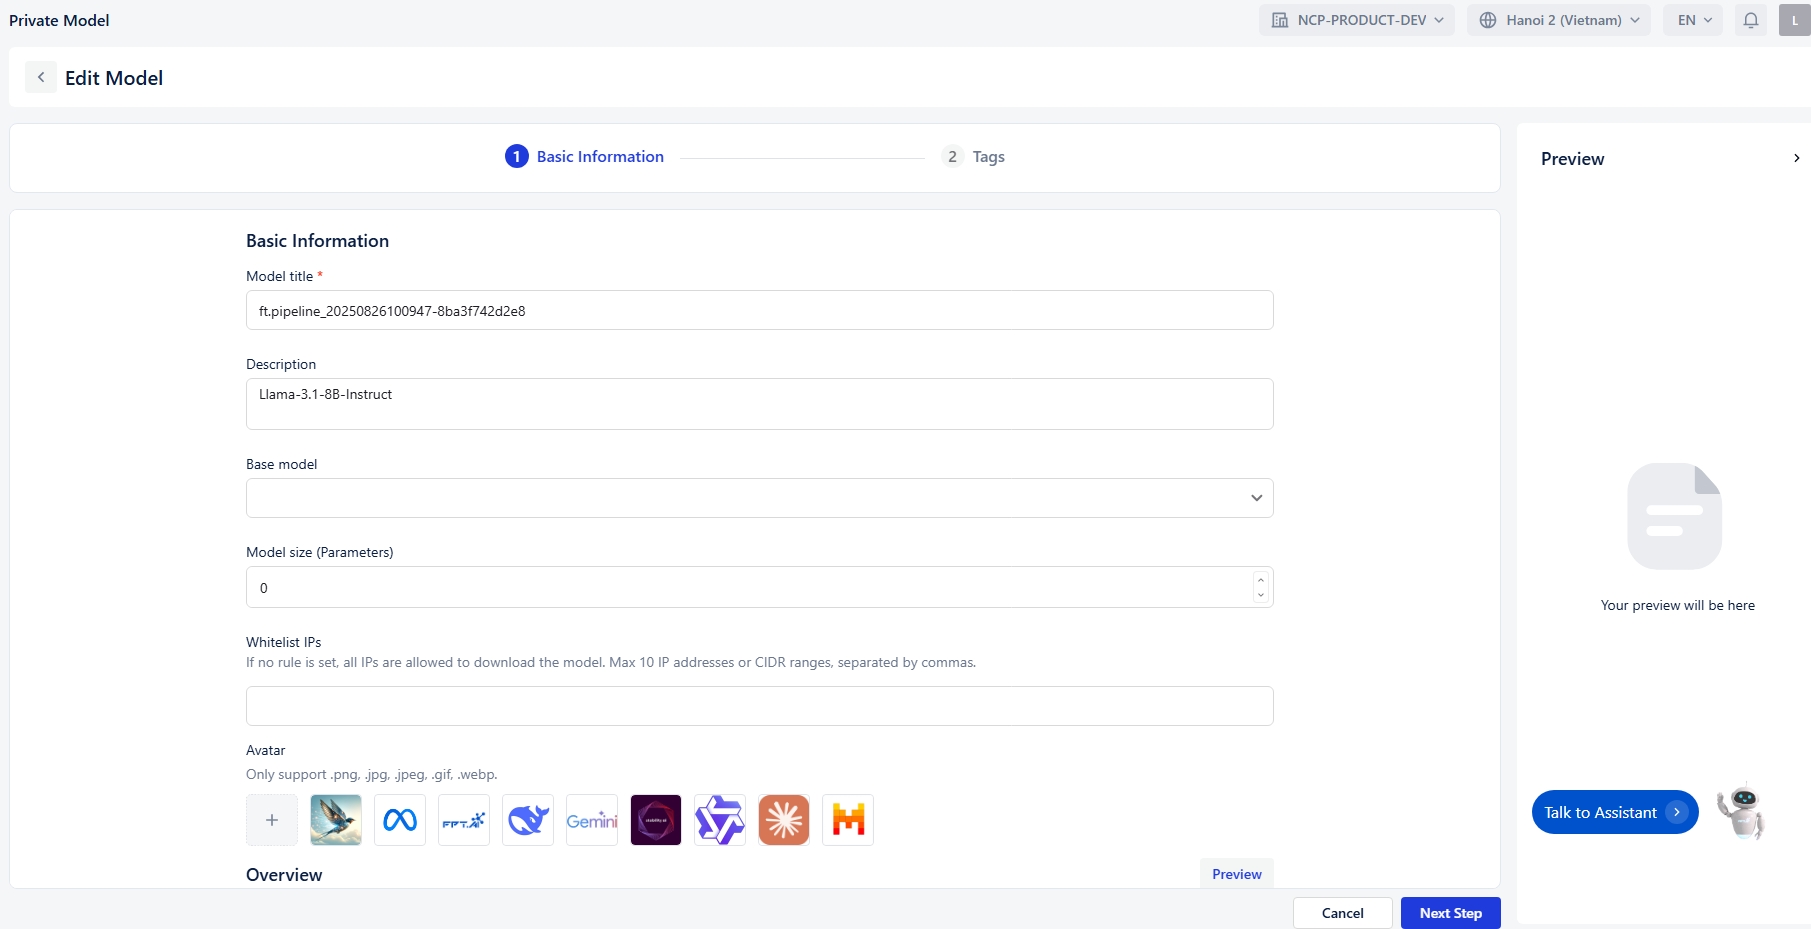
Step 1: Fill in Basic Information
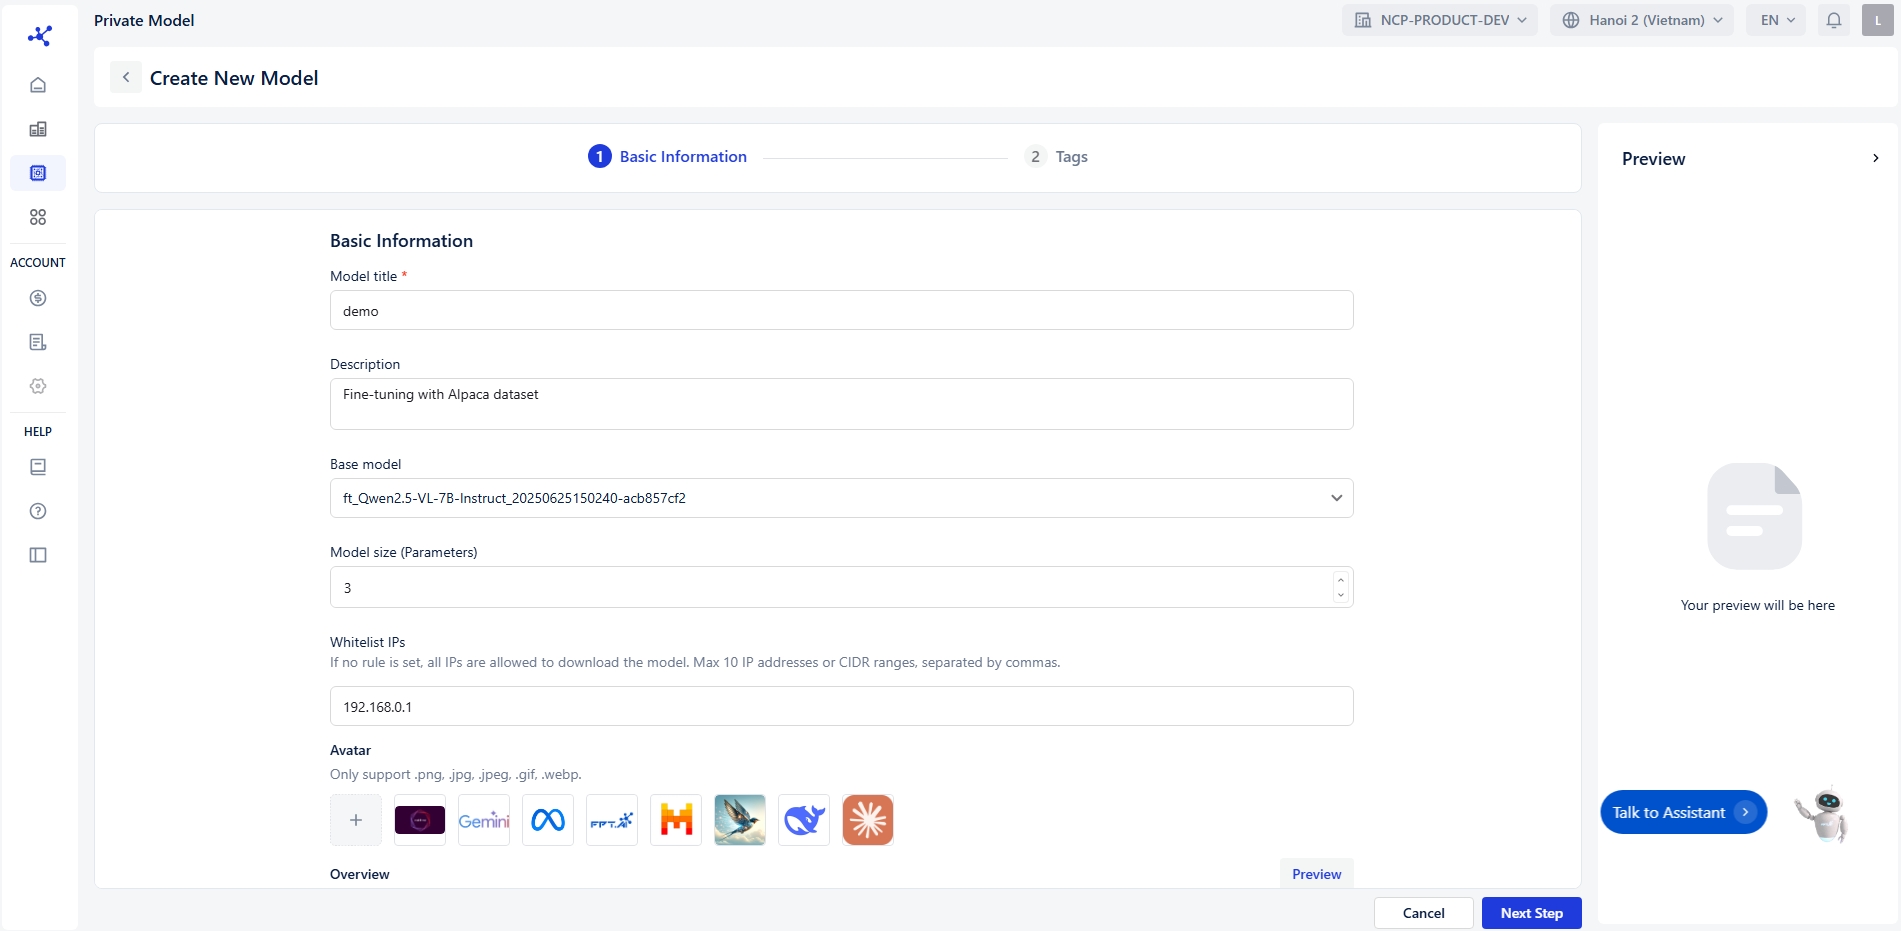
In the Basic Information section, complete the following fields:
Model Title: Enter the name of your model (required).
Description: Provide a short description of the model’s purpose.
Base Model: Select the foundational model (e.g., GPT-4, LLaMA).
Model Size (Parameters): Specify the model’s parameter size (e.g., 7B, 13B).
Whitelist IPs: Add IP addresses that are allowed to access the model.
If no rule is set, all IPs are allowed to download the model. Max 10 IP addresses or CIDR ranges, separated by commas
IPv4 format:
x.x.x.x, where each x ∈ [0, 255]
Optional CIDR suffix: /y, where y ∈ [0, 32]
✅ Valid: 192.168.0.0 ❌ Invalid: 192.168.300.1
Avatar: Upload an image to represent your model (optional).
Overview: Write a detailed overview using rich text formatting (bold, italic, lists, etc.).
Step 2: Add Tags
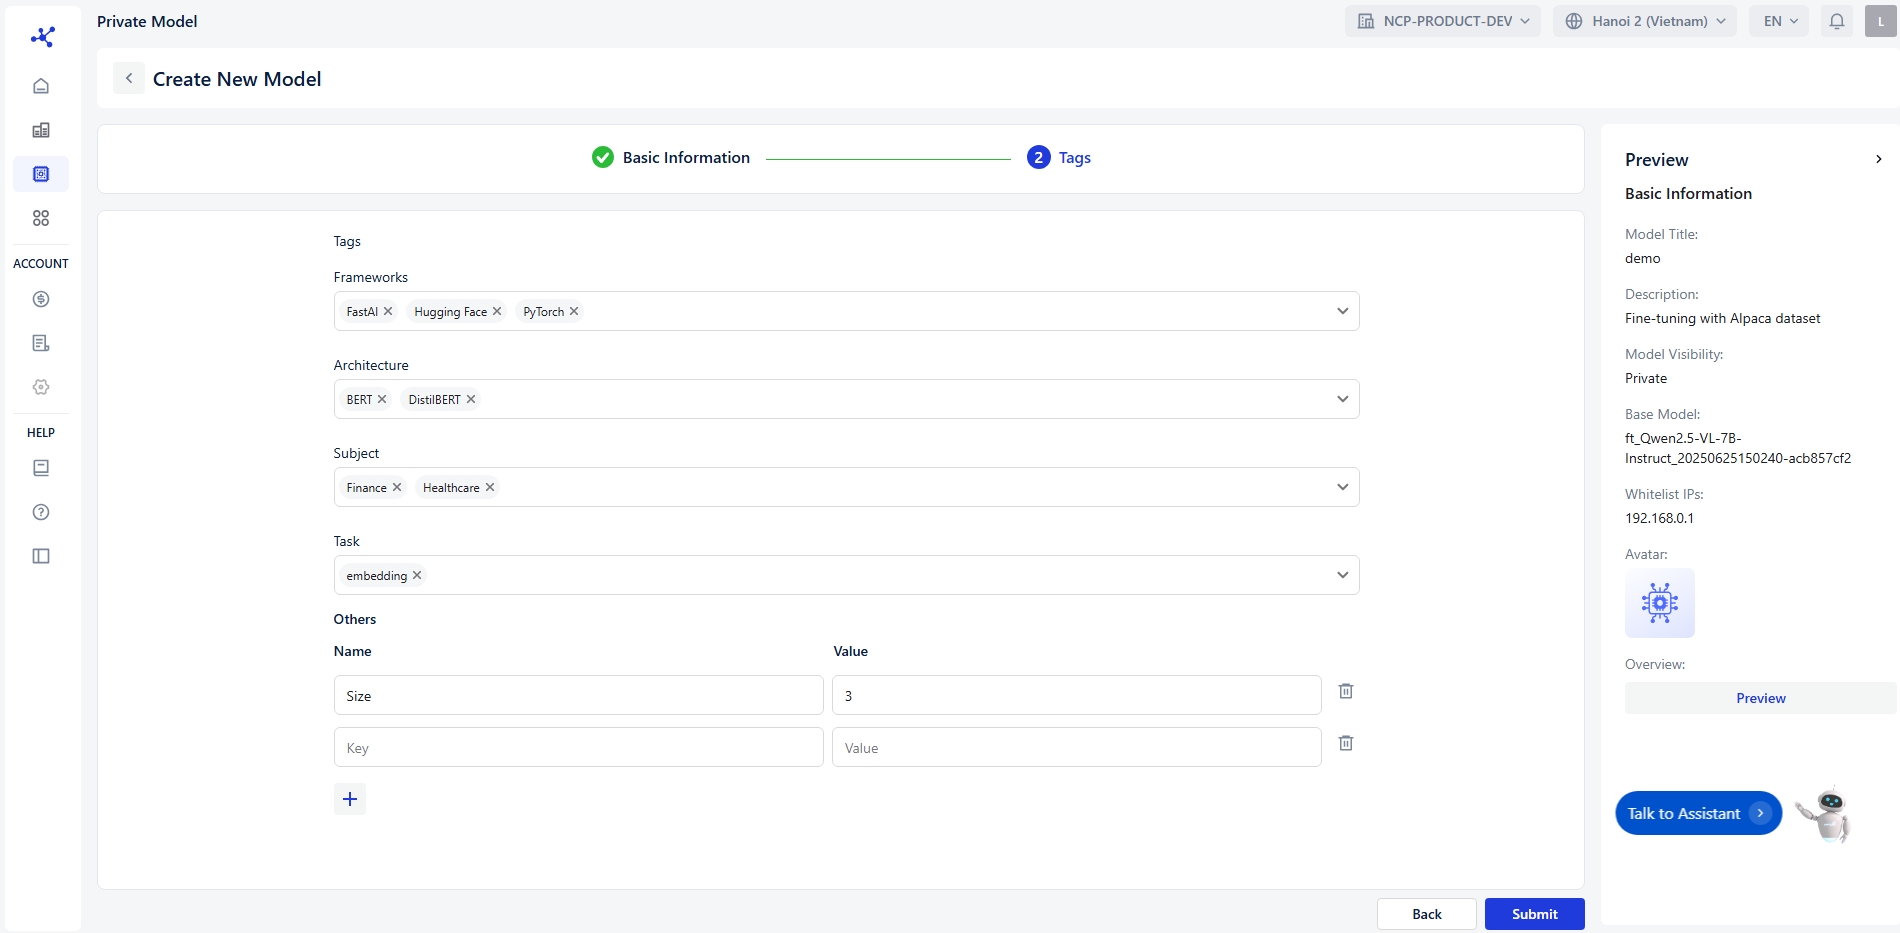
Use the Tags section to assign relevant keywords to your model for easier categorization and searchability.
Tag Categories
You can assign tags under the following predefined categories:
Frameworks: Specify the development framework used (e.g., PyTorch, TensorFlow).
Architecture: Define the model architecture (e.g., Bert, DistillBert, EfficientNet).
Subject: Indicate the domain or field the model is related to (e.g., Healthcare, Finance, Education).
Task: Describe the model’s primary function (e.g., Text Classification, Image Classification, Embedding).
Others: Add any additional tags that don’t fit the above categories.
Step 3: Preview
The Preview panel on the right will display a live preview of your model based on the information you’ve entered.
Step 4: Navigation
Click Cancel to discard changes and exit.
Click Submit to finalize and create the model.
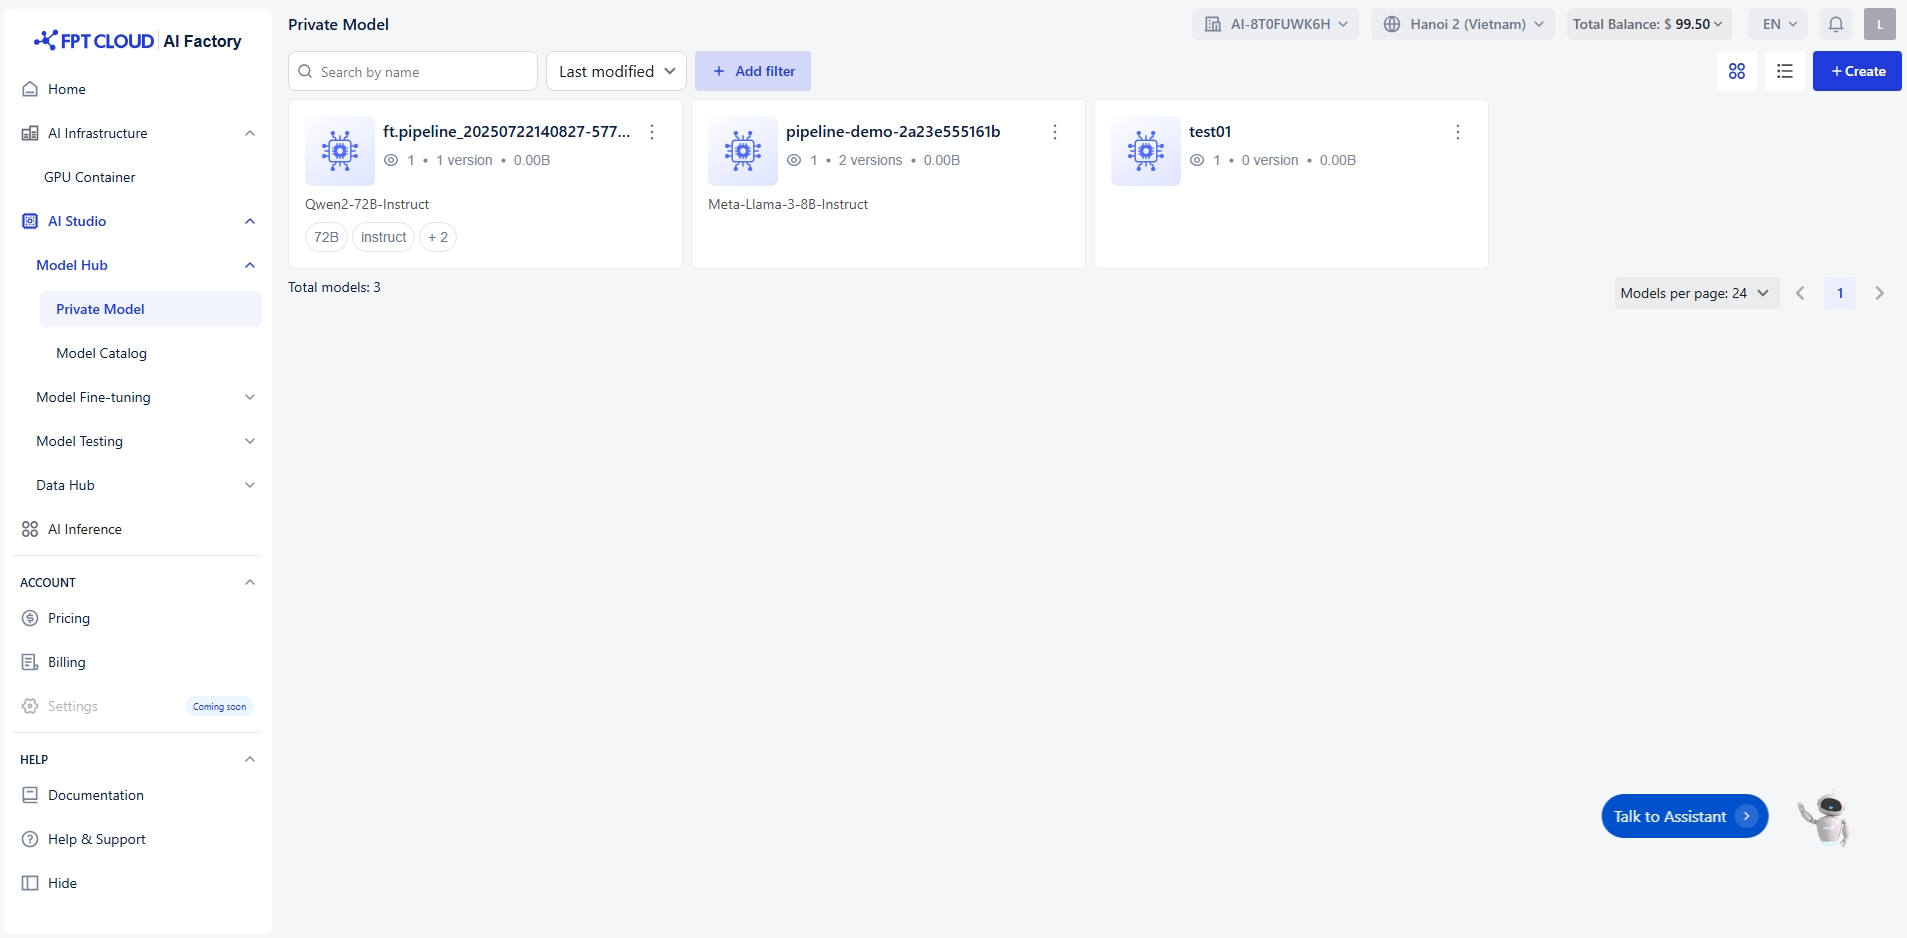
View list Models
Each model card shows:
Model name (e.g.,
pipeline-demo-xxxx)Base model used (e.g.,
Qwen2-72B-Instruct,Meta-Llama-3-8B-Instruct)Number of versions
Model size (storage usage)
Access & usage info (e.g., number of viewers)
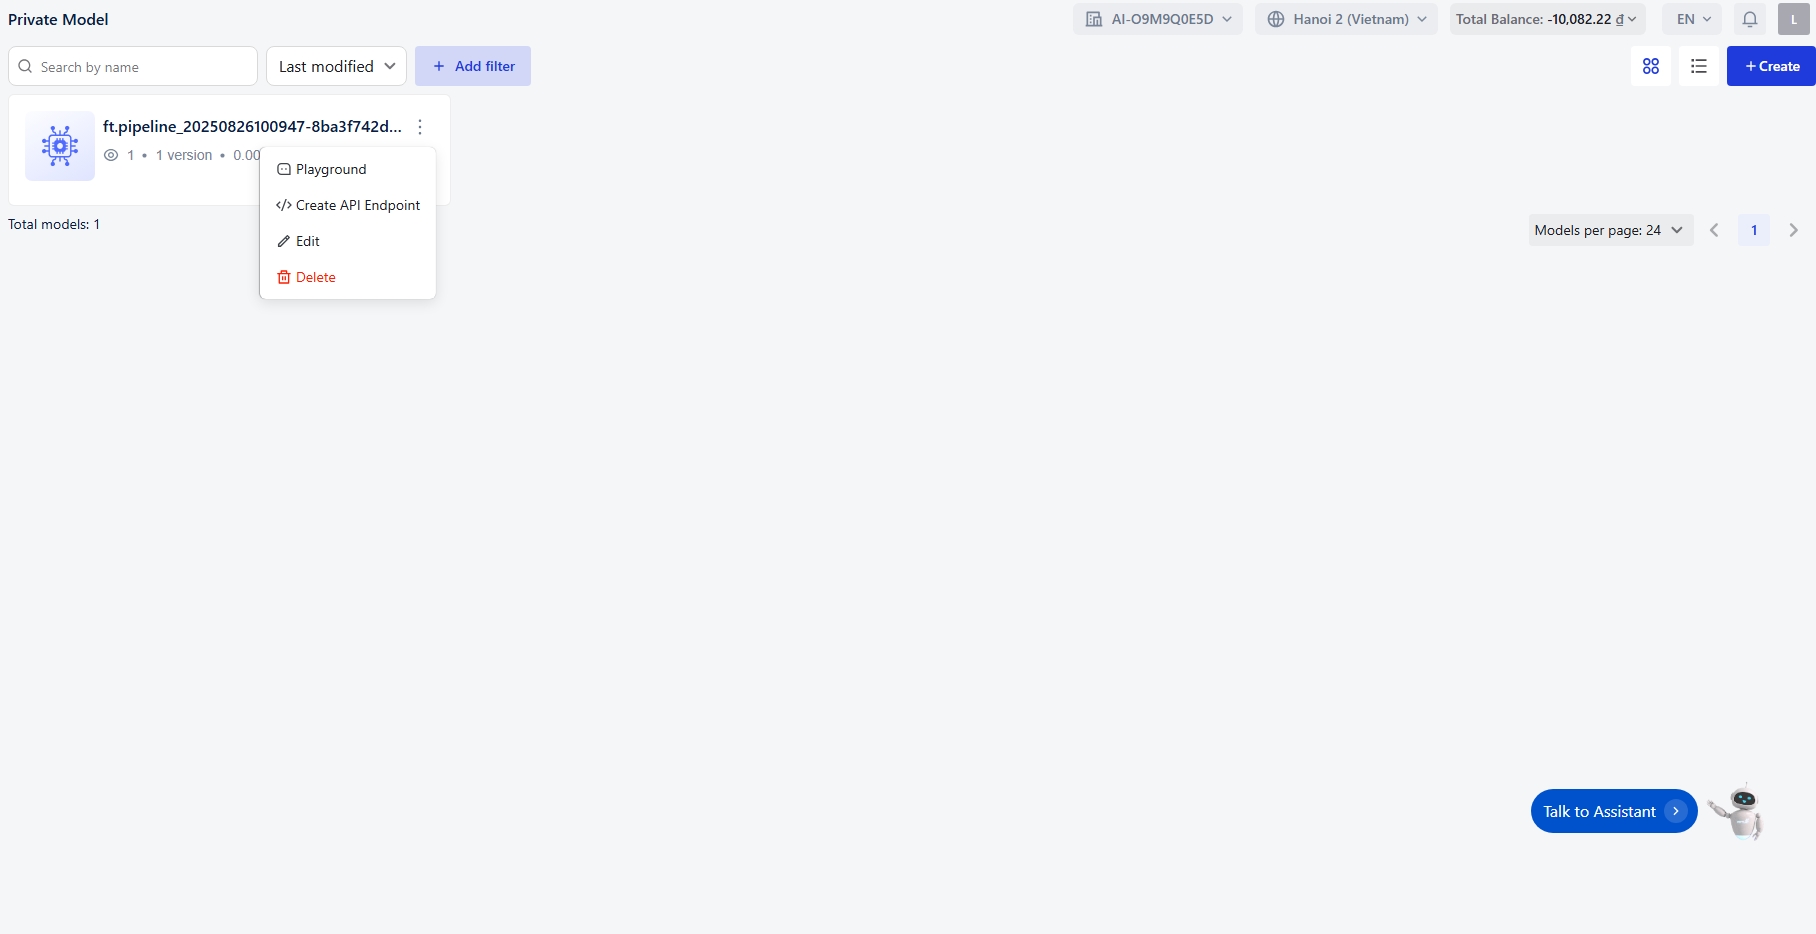
Click the three-dot menu (⋮) on a model card to access more actions such as:
Playground
Test the model directly in the Playground interface. You can interact with it before deployment.
Create API Endpoint
Generate an API endpoint for the model so it can be integrated into your applications or services.
Fine-tune
Customize the model using your own dataset to improve performance for your specific use case.
Delete
Delete a model

Browsing and Filtering Models
Use the search bar (top left) to quickly find a model by name.
Use the filter menu to sort models by:
Last modified
Model size
Other attributes (you can add filters by clicking + Add filter).
Adjust Models per page (bottom right) to show 4, 8, or more models.
View Model Details
A model includes the following components:
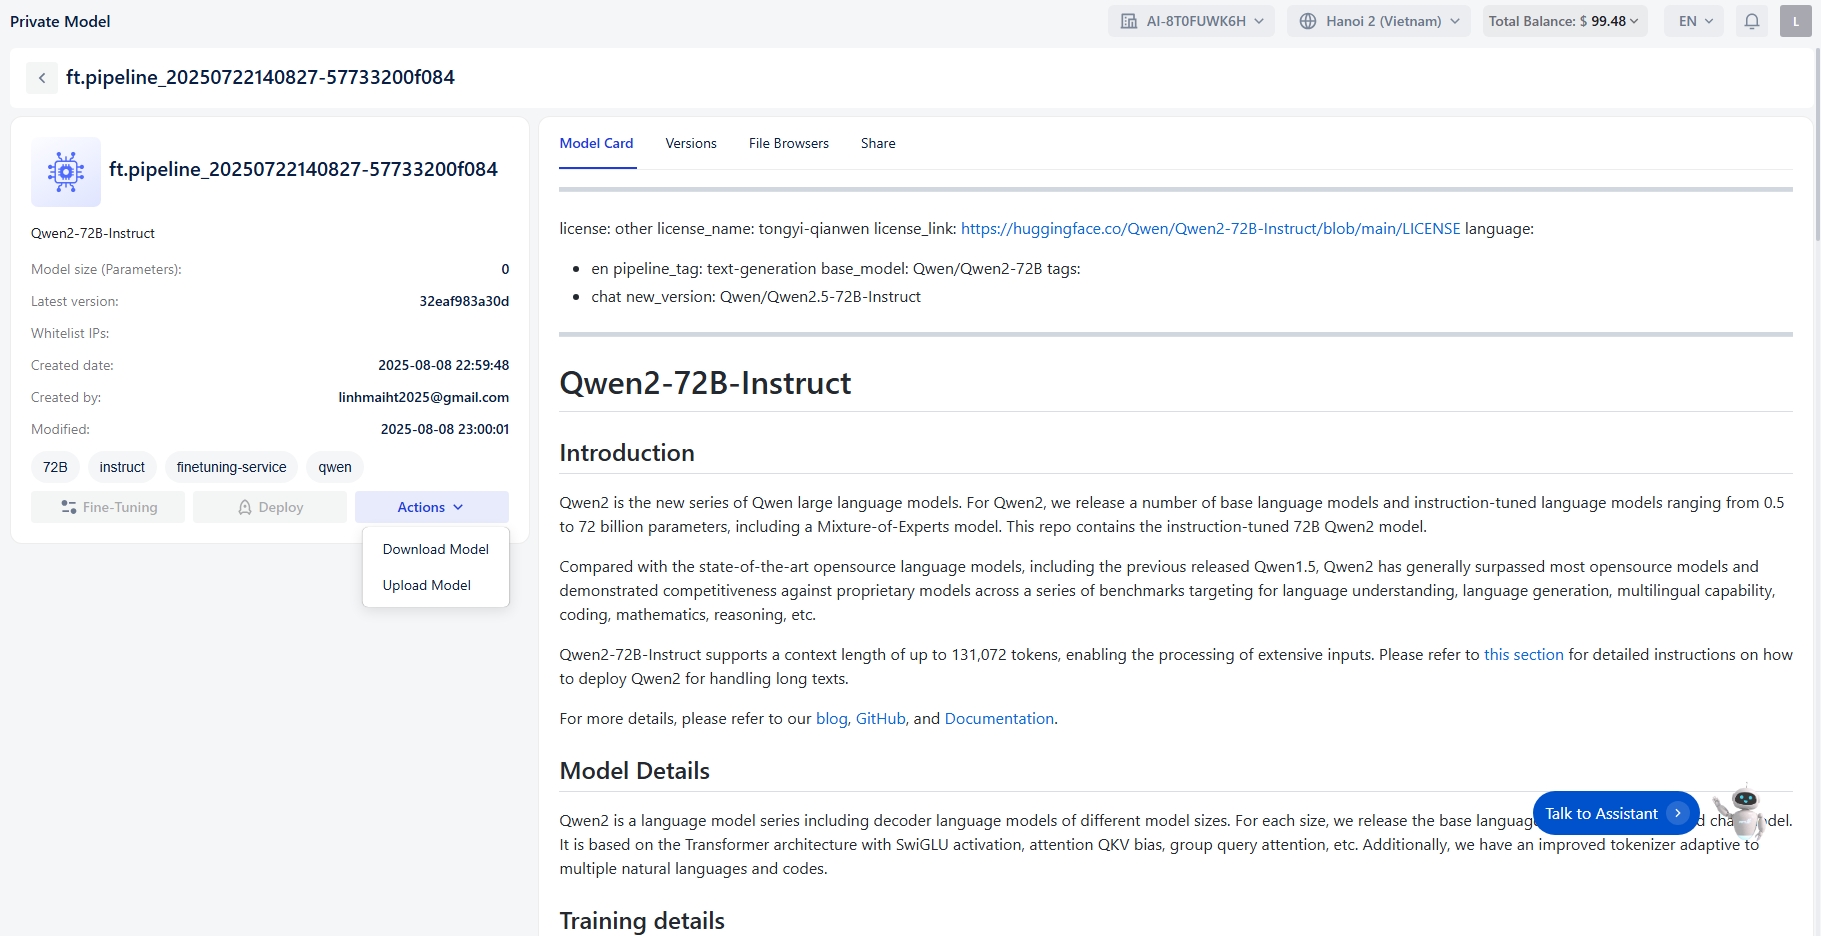
Model title: The name of the model
Base model: The base model used
Model size (Parameters): The total size of the model
Latest version: The most recent version, created closest to the time of viewing details
Created date: The date the model was created
Created by: The user account that created the model
Modified: The most recent date the model information was updated
Tags: Tags associated with the model
Actions: Available actions for the model
Fine-Tuning
Deploy
Download Model
Upload Model
Model card
Model card: Overview information about the model
Versions
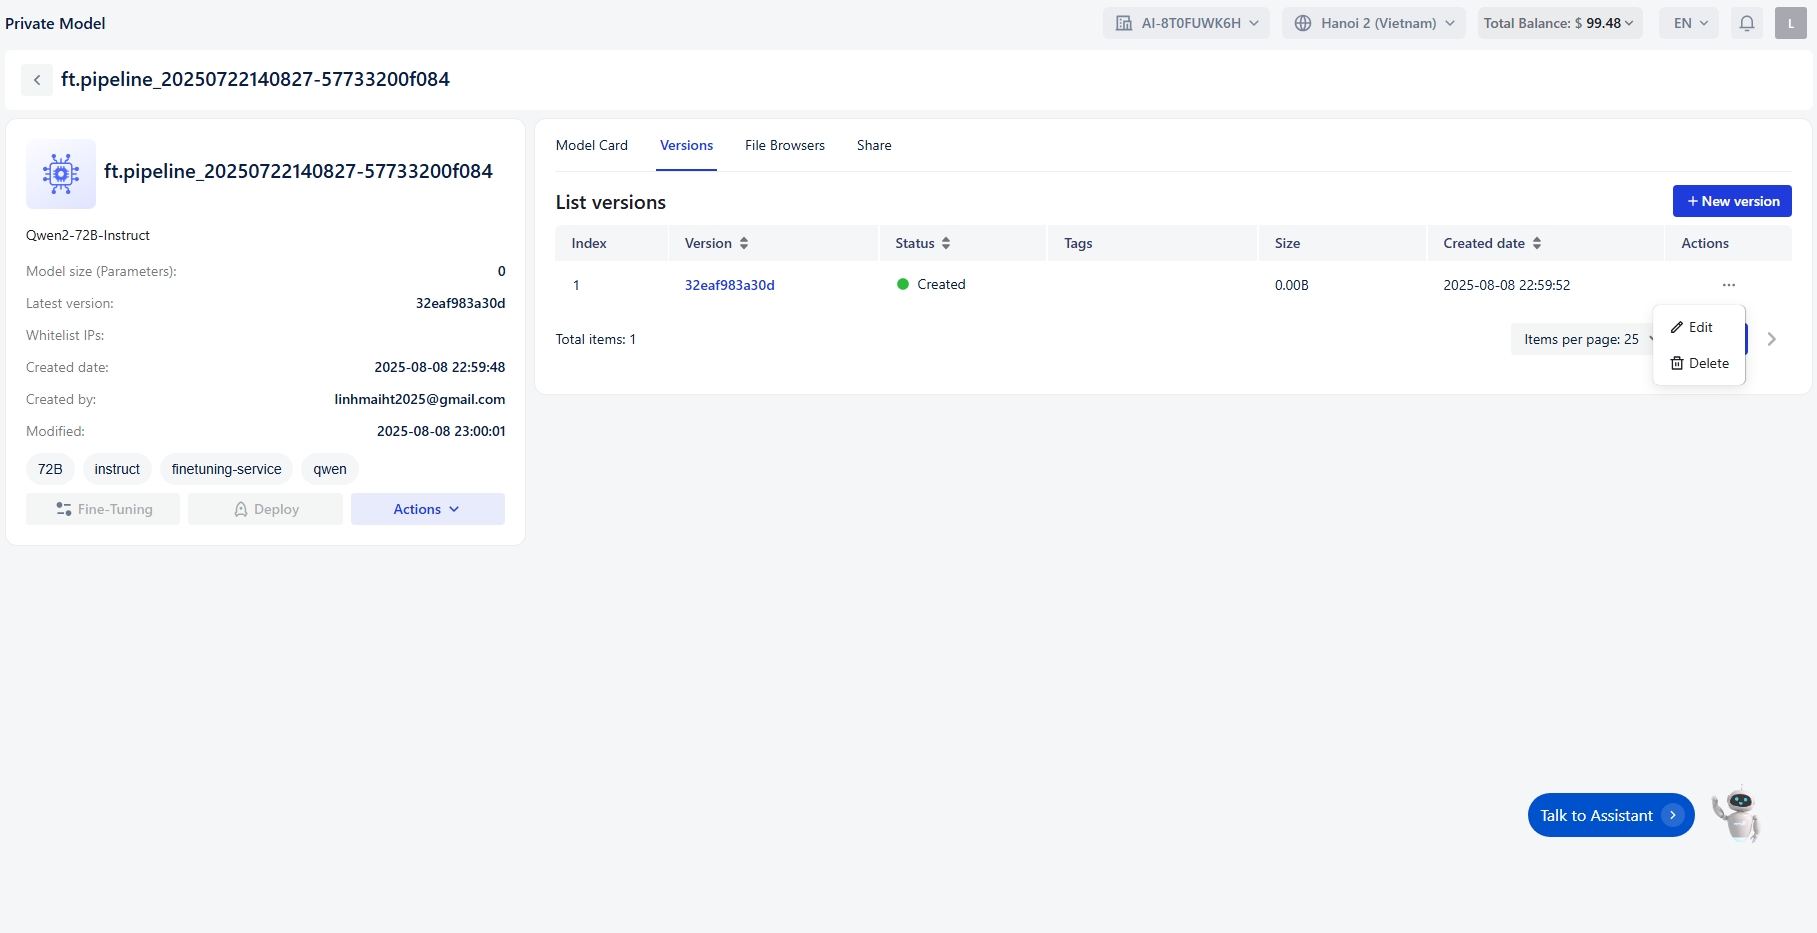
Index: The order number of the version.
Version: Unique identifier for the version (clickable for more details).
Status: Current state of the version (e.g., Created, Training, Deployed), indicated with a colored dot.
Tags: Optional labels for categorization.
Size: File size of the version.
Created Date: Timestamp of when the version was created.
Actions: Options to interact with the version (e.g., edit, delete).
File Browsers:
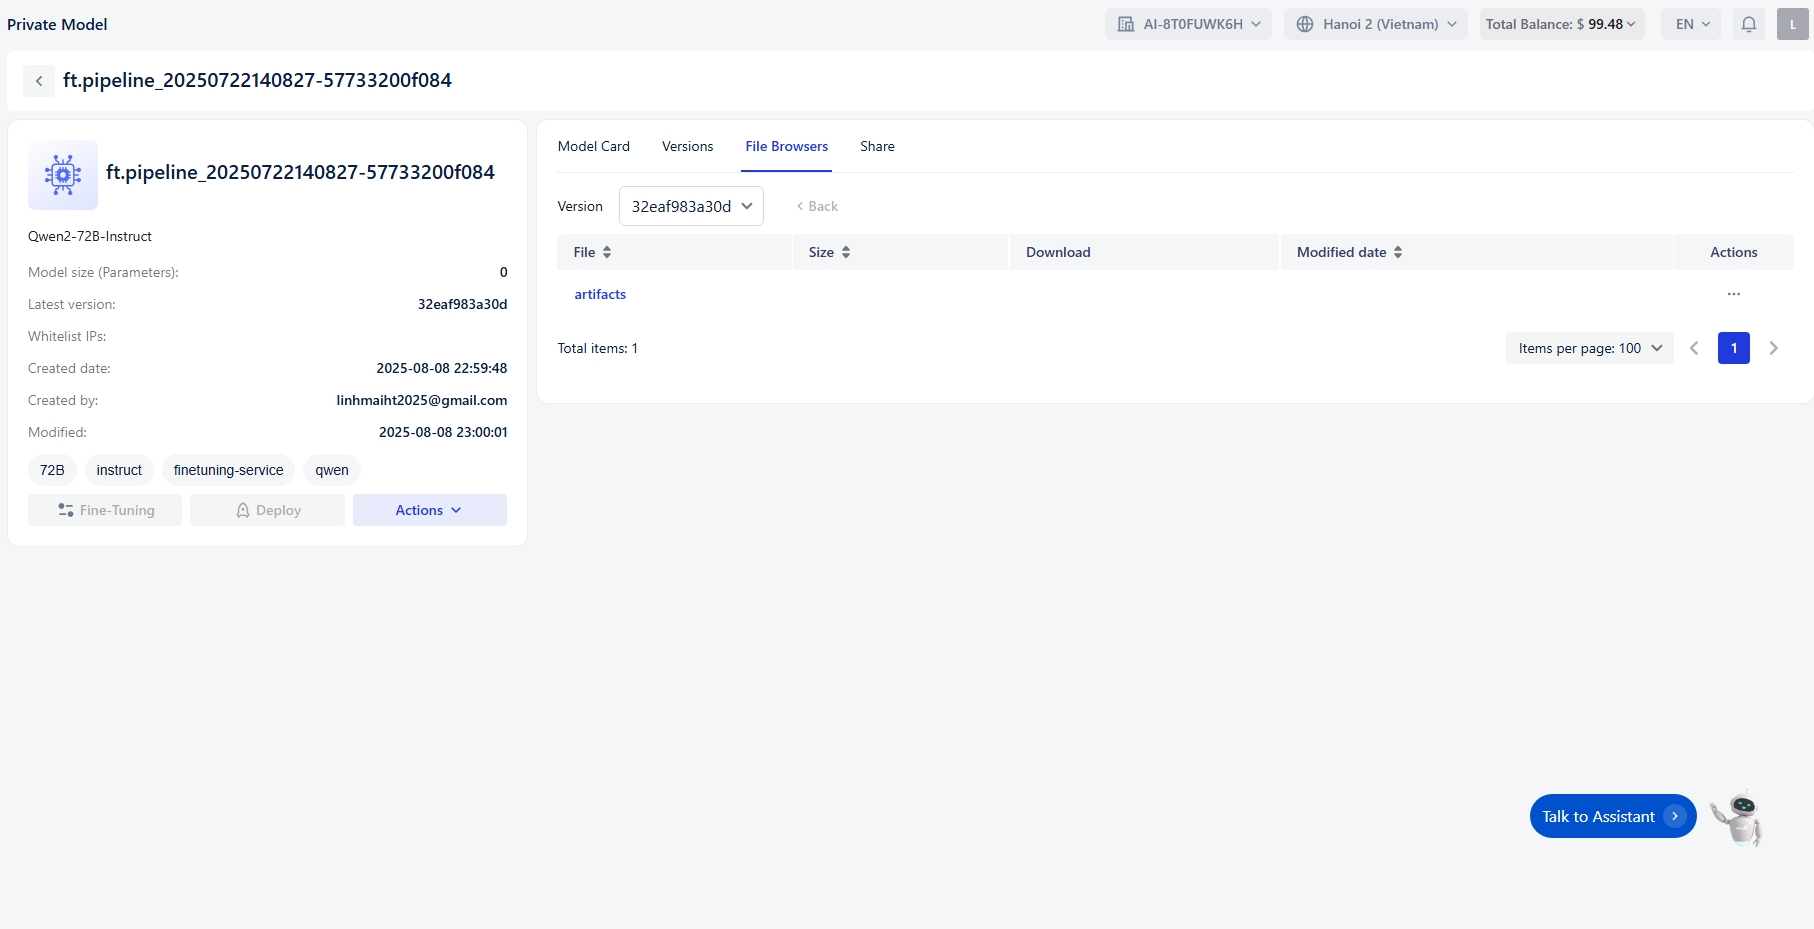
Displays the uploaded files corresponding to each version
File: Name of the file or folder (e.g.,
artifacts).Size: File size.
Download: Option to download the file.
Modified Date: Timestamp of the last modification.
Share
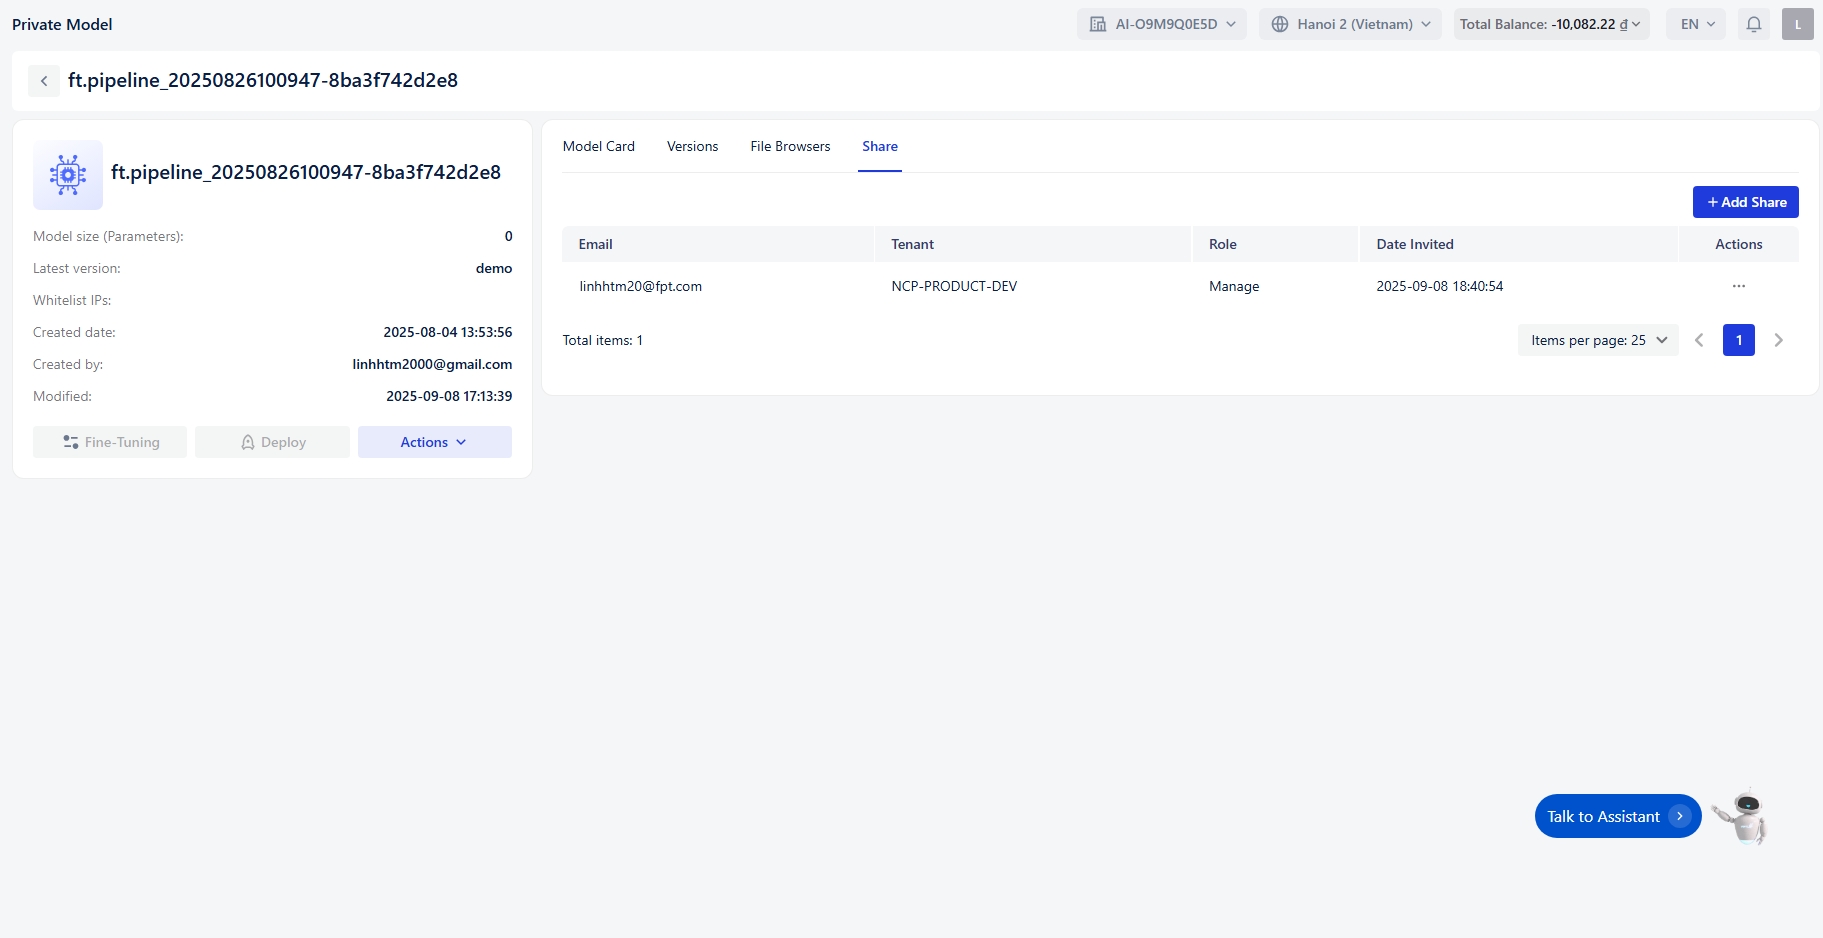
Allows sharing the model with others
Email: The email address of the person the model is shared with
Tenant: The tenant associated with the owner’s email
Role: The role of the person the model is shared with
Date invited: The date the user was added to the model
Action: Options to update or remove the user from the model
Edit Model
Edit Model allows users to update the details of an existing private model, including its metadata, configuration, and access settings.
Step 1: Locate Your Model
Use the search bar at the top to find your model by name or keyword.
Apply filters (e.g., version, size, tags) to narrow down the list.
Step 2: Select the Model
In the model list, each entry displays:
Model Name
Version
Size
Tags
Click the Edit button next to the model you want to modify.
Step 3: Editing the Model
Once you click Edit, you’ll be taken to the model configuration interface where you can:
Update Basic Information: Change the title, description, base model, size, avatar, and whitelist IPs.
Modify Tags: Add, remove, or update tags under categories like Frameworks, Architecture, Subject, Task, and Others.
Preview Changes: Use the preview panel to review updates before saving.
Step 4: Finalizing Changes
Click Submit to save your edits.
Use Back to return without saving.
Delete a Model
Delete a model allows user to delete from the list of created models
Step 1: Locate Your Model
Use the search bar at the top to find your model by name or keyword.
Apply filters (e.g., version, size, tags) to narrow down the list.
Step 2: Select the Model
In the model list, each entry displays:
Model Name
Version
Size
Tags
Click the Delete button next to the model you want to delete.
Step 3: Delete the Model
Once you click Delete, a confirmation dialog will appear. To confirm deletion, type "confirm" into the text box. The Confirm button will become enabled once you enter the text.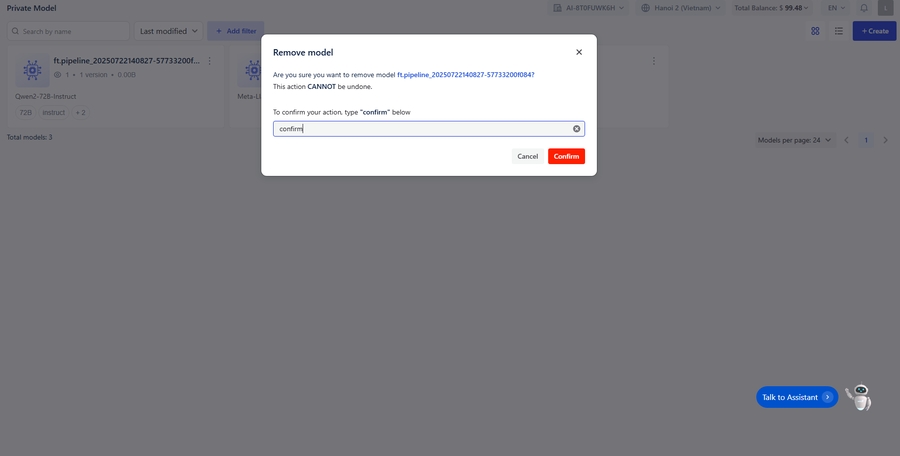
Step 4: Finalizing Changes
Click the Confirm button to delete the model
Click Cancel to cancel the action.
Last updated